3D Printering – The Ender 3 Pro….

Just over a year ago I purchased my Creality Ender 3 Pro…an absoloute steal at about £140 after discounts and Topcashback special offer at the time.

I was having so much ‘fun’ with my Wanhao Duplicator 9 that I didn’t open the box for nearly 1/2 a year. and I only fired the thing up a few months ago!

I have to say, I’m impressed. The printer deserves its rabid fanbase following. It printed flawlessly out of the box without any setting up.

It’s surprising the difference having a reliable ‘work horse’ printer makes to the hobby. I need a bit – I just go print it. no faffing about with levelling and bed adhesion.

Till it doesn’t…….

OOps!

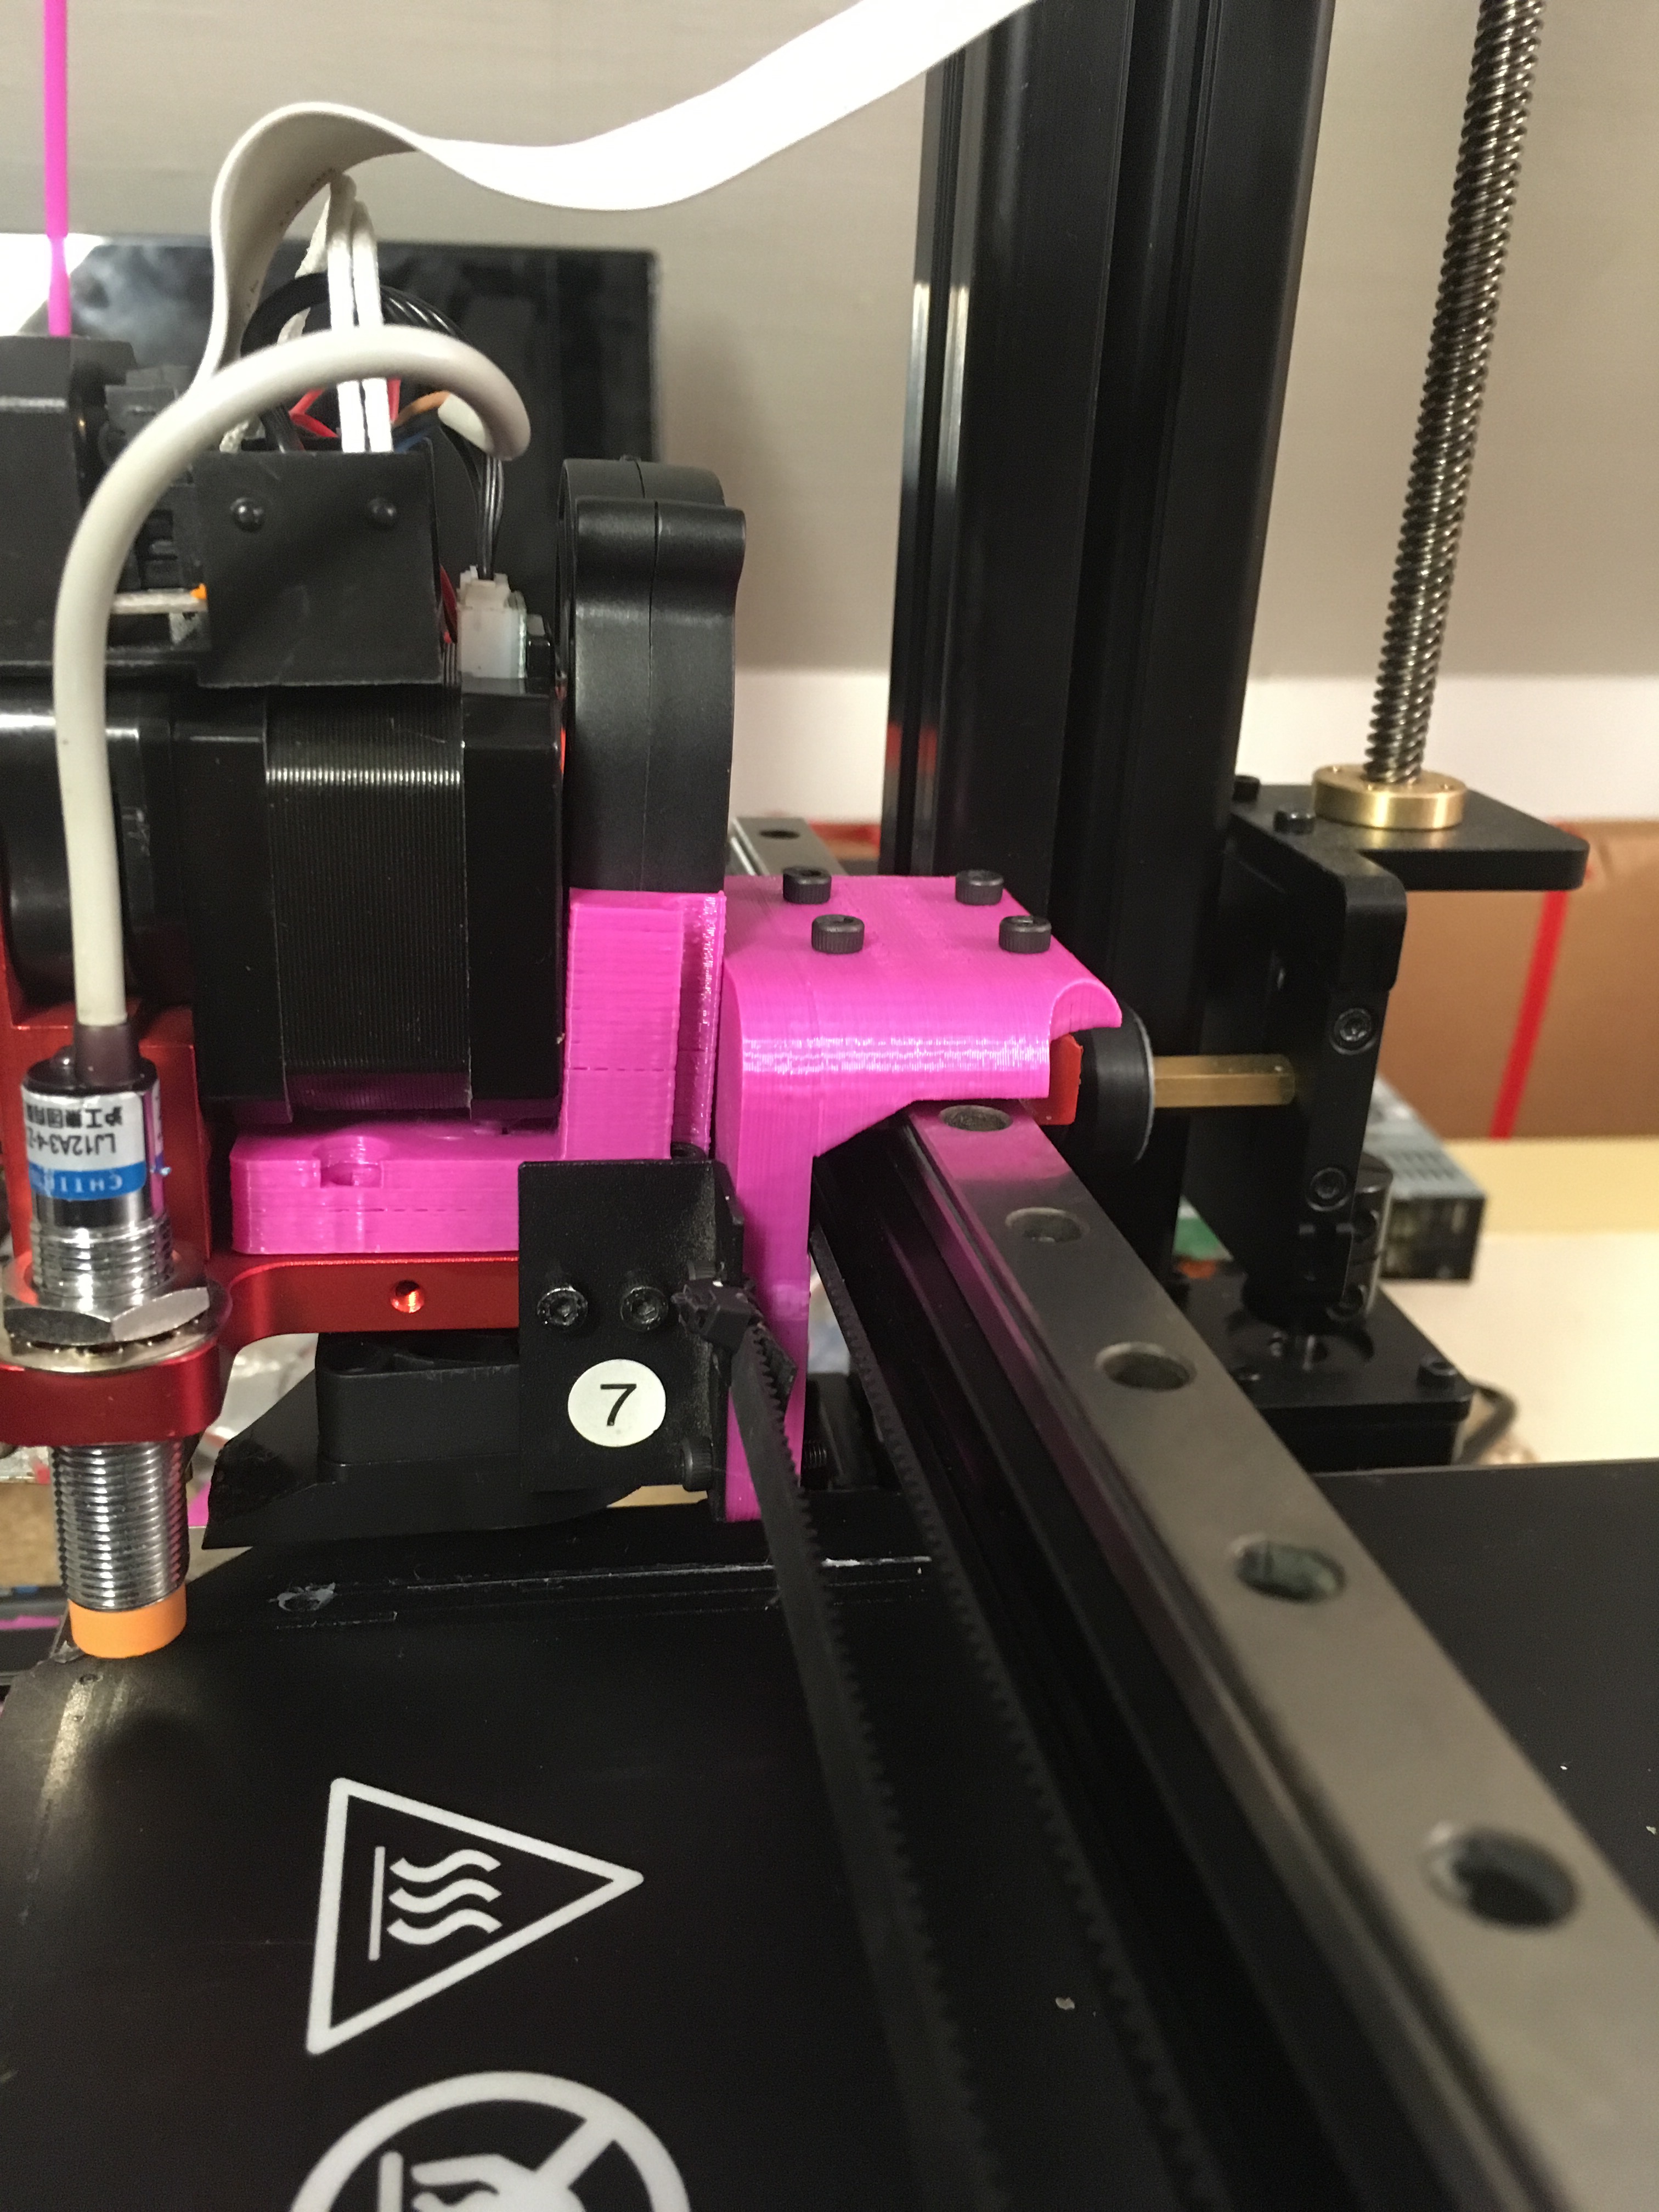
Note, if your previously reliable printer seems to under-extrude, even on known great filament – try the extruder arm.

Something seemed ‘off’ when printing standard stuff – almost overnight the printer just seemed to under-extrude, not be reliable and, well, become more like my Wanhao D9 (a bit crap)

Even bizzarely, the printer would print OK over to the left, but under-extrude to the right. Took an hour to diagnose this! When the head was over to the right – it would pull the mechanism slightly which dislodged the arm enough to slip the filament.

Luckily, This extruder tech hasn’t moved in years…….An unassembled, missing parts kit I picked up off facebook a couple of years ago (syntek, sintek or something similar) which itself was a few years old had just the part..(which complete, looks identical to this Aliexpress one …..

Works a treat….

Except….There’s those new fangled ‘dual gear’ type extruders they’re on about….

and….well, I have a LOT more spares upstairs that i’ve gathered!

And, well, if i’m upgrading one extruder drive mechanism, it’s shockingly easy to add a second….

and…

Fortunately (for the Ender 3) , My Wanhao Duplicator 9 decided to ‘blow up’ a bit *Probably assisted by my dual 5015 blower fan mods

See that Poor MOSFET M3 – Right by R12….

So, now, my D’s guts, kinda look like this……..

What’s best! – I now have a working 3D printer that I can use to print parts for my broken 3D printer!

Wooo

Now, looking at dual extruder mods……… – https://www.thingiverse.com/bleugh/collections/3d-printer-carriage

looks like my tinkering time’s filled up again. gotta get designing a ‘fix’ for the D9…and a dual extruder / colour setup……

Wanhao D9 – Bed leveling -do this to make it work!

Add M420 S1 after G28


Someone on facebook suggested that the stock wanhao Firmware doesn’t handle leveling propertly. They’re right

Check out……..

https://reprap.org/forum/read.php?415,789128


given the 1000’s of people having issues getting the D9 to print properly, there does seem to be something fundamentally wrong with the printer….


In your Cura / startup script, find G28

Continue reading “Wanhao D9 – Bed leveling -do this to make it work!”

Wanhao Duplicator 9 – New X Axis parts coming – Part 2

My printer / PC should be back up and running on the weekend, based on some feedback from a trial tester, I’ve modded the brackets a little – namely to improve the ease of removing of the supports in the stepper motor part , and increasing the height a little for the idler mount on the right…

Some more tweaks will happen before I get to properly print and test, then I’ll upload


left X V2

Above shows the lines inserted in the NEMA17 stepper motor mount. This should negate any need to use supports


Continue reading “Wanhao Duplicator 9 – New X Axis parts coming – Part 2”

Wanhao Duplicator 9 – New X Axis parts coming

It’s been a busy personal and work life for the past few weeks so it’s been difficult to ‘tinker’……….I have however made something new!………….. Continue reading “Wanhao Duplicator 9 – New X Axis parts coming”

D9 – Some more upgrades – Belt Tension

I’ve designed another thing that solves some more problems with the D9 – a Belt tensioner!

Jerome Waweru D9-300 Y Axis Tensioner 9mm 1
Thanks to Jerome on Facebook for posting a pic of his Tensioner

I’ve posted this up on Thingiverse……….

It’s been printed at least 10 times by guys on the facebook group and provides an immediate and cheap improvement over the stock……..

Continue reading “D9 – Some more upgrades – Belt Tension”

Wanhao D9 – Poor Y axis design and free printable fix

D9 Motor mount 3

During my tinkering time with the printer, trying to improve the print quality I noted that something seemed a little ‘off’ with the Y axis movements……

Continue reading “Wanhao D9 – Poor Y axis design and free printable fix”

Aluminium beds – some thoughts on levelling

The Wanhao printer bed is made of Aluminium, below this is a flexible heating element.

It’s been widely reported that the D9 doesn’t level very easilly, Here’s why people are having issues….

Aluminium expands when heated!

If you’re having ‘levelling issues’ ensure to do the electronic bed levelling whilst the bed is hot! – (pre-heat to typical printing temperature first)


Anyways, some math.

Here’s a datasheet for the Aluminium I purchased for my carriage upgrade

Two things I note here –

Physical Property Value
Density 2.71 g/cm³
Thermal Expansion 24 x10^-6 /K

Density – Steel (which the carriage is made of) is generally around the 7 – 8 g/cm³ – or Three times that of Aluminium! – win there, I can use a sheet of aluminium Three times thicker than the steel on the carriage and have the same weight (in theory)

Thermal Expansion – Translated this means that Aluminium expands by 24 micrometers per millikelvin. Also known as 0.000024 meters per degree


How does this affect the D9 Printbed?

When heated, the 325 x 325 x 2mm thick aluminium bed  becomes a bit larger

………How large?


Here follows some very rough calcuations……..

Continue reading “Aluminium beds – some thoughts on levelling”

Wanhao D9 Bed upgrade

The Wanhao Y axis ‘bed’ is known to be a little flimsy,

It’s made from pressed, welded steel sheet just under 1mm thick and notably flexes when adjusting the levelling springs

Some closeups below….

My new plan – Create a new Bed / Carriage with some suitably cut Aluminium from this bloke on ebay – 4mm thick and 325 x 325mm for just over £13, bargain!.

Once cut, this should be stiffer and more importantly, lighter than the existing carriage as shown below…….


https://www.ebay.co.uk/itm/Aluminium-Sheet-1mm-1-2mm-1-5mm-2mm-3mm-4mm-1050H14-S1BH4-Various-Sizes/271210657802

1 bed

2bed
When tightning, this black part can often bend, it’s only 1mm thick!
img_1175
Exposed bed – it looks ‘deep’ from the front, but the ‘wings’ on the sides are flimsy and flex with levelling

More Upgrades – X axis Linear Rails

Finally got a few hours over Christmas to knock up the X axis linear rails upgrade for the printer.

Printer seems to run nicely and i’ve printed a few small things….I’ll work on quantifying any improvements next as, right now it only ‘seems’ better, and print quality improvements are really marginal. The biggest difference was on the Y axis bed, and I suspect there are now easy further improvements to be had………

Photos Below

img_1488
Side view showing the new Carriage (designed by someone else)

img_1486
The new idler mount – this was needed as existing thingverse ones don’t have space for the rail at the top

img_1489
Top down view of the new rail carriage

img_1485
side view of the new idler and it’s tension adjustment screws

Bed offset and a fix! – now prints 310mm circles

Recently I’ve been requested to make a ‘small’ thing for a friend ..I knocked up a very quick test thingy to see if I could

Link to Tinkercad file300mm

Turns out, I initially couldn’t!

Continue reading “Bed offset and a fix! – now prints 310mm circles”

MGN12H rails small tweaks to perfect…

Ok, the rails are on and working a treat, kind of…

The right angled fittings I purchased to secure the 20×20 extrusion to the 40×40 have some little tabs on them, I can’t find any readily available way of securely making this connection with off the shelf parts so i’ll have to grind down one side’s tabs…

The slight amount of pressure this tab is putting on the extruision is enough to twist it and stop the MGN rails from running smoothly!

img_1176
A secure 20×20 extrusion. But slightly twisted due to the small lump

img_1181

View from below…if I add a little drop down to the right hand carriage, it’ll be easy to re-use the existing limit switch by mounting it on the side of the 2020

img_1185img_1179

Close ups of the existing limit switch and the protrusions on the right angled mounting block.

Overall, minor things , but shows you should plan things a little in advance and test fit stuff before ‘going for it’

Fortunately this is nothing a quick angle grind and carriage print can’t fix….which means re-assembling the original printer to print a new bit, D’oh!

It’s alive! – kind of. MGN12 Rails update

Well, the MGN12H linear rail carriages fit into the new carriage adaptors I quickly knocked up in Tinkercad perfectly!

And, don’t they look lovely in Purple (great filament from 3D Filaprint)

Now, to dismantle the printer and see if the print bed tray fits…………

That’s the problem with printing stuff to upgrade a printer, iterating takes time and stuff gets dismantled waaay too much! I need a second printer :-p

D9 Linear rails upgrade – Bed

d9 202 wide base by 120 deep

I’ve found a solution to having a fairly stable base that’s wider than the 60mm square wheel carriages Wanhao uses…

It’s possible to create a 120mm wide base, IF you offset the mounting of the bearing blocks from the centre as can be seen above and below…

Continue reading “D9 Linear rails upgrade – Bed”

Wanhao D9-300 Linear rails upgrades…

220mm base too wide 3Just running through a few ideas in Tinkercad whilst I await some parts to arrive….it pays to mockup things before committing to a design, I’m liking how easy Tinkercad is to do something that, on the surface looks quite complex………

on My D9, looking from the front, the Y axis rails are spaced at 202mm edge to edge….so it makes sense that an approximatley 202mm deep by 202mm wide square would form the most stable base available, whilst still using the original dimensions of the frame………..

….Nope…..


The mockup above  shows a base plate of 202mm square bolted straight to the Hiwin clone rails……also shows the 325mm outline of the heated bed – it’s transparent to help visualise

Unfortunatley, having a 202mm square base for the linear rails bearing blocks has prevented the 325mm moving bed from obtaining its full travel – you can see below the the vertical line of the extruder output is not too far from the centre of the bed, even though if the bed moves forward, the bearing blocks will run off the end of the rails

220mm base too wide 3

This image below shows how far the blocks need to move off the end of the rails to allow the extruder to almost reach the edge of the heated bed

220mm base too wide 2


The extruder can easily reach the end of  the heated bed when the bed travels backwards – with the additional slight overhang provided by the 500mm long rails being used

220mm base too wide 1


so, summary

I’m not going to be using a 200ish mm square base plate with my 4 linear rail blocks on!…

it’s looking like it’ll need to be a 200ish wide rectangle that’s hopefully not less than 100mm deep – as the linear rail blocks are 45mm!

Still here! – Forthcoming upgrades


In my never ending quest to do everything to this printer, other than to print stuff, I’ve decided to perform a series of upgrades. It’s been a few months of indecision and procrastination, but…


Upgrade 1 – Linear Rails

Found these from a few forum posts recommending the manufacturer in CNC forums…

It’s a Hiwin copy , I’ve purchased the MGN12 – 500mm rails and the MGN12H bearing blocks…

I’ve received the rails and very impressed. Currently waiting another 3 x MGN12H in the post to make 6 total…and then I can get started

6_UT8YI5HXbtbXXagOFbX4

AliExpress Hong Yi Automation Store

Continue reading “Still here! – Forthcoming upgrades”

Bad prints – Grr, the importance of cooling

img_7376

After the old soap and water life’s lesson and getting some fantastic print bed adhesion, the printer ‘developed’ * another problem……………


*by developed, I mean, ‘I’m an idiot’…..Probably…………..[just scroll to that bit below to avoid a few paragraphs of waffle

Continue reading “Bad prints – Grr, the importance of cooling”

Power Consumption and Smart Plugs

6102fVuF0NL._SL1000_

Picked myself up a cheap Wifi Smart Plug

I figured that if Octoprint can monitor the printer remotely…..if I see on video anything spontaneously combusting, I can remotely cut the power too!

I’ll figure out some scripting at some point to allow temperature sensors / smoke sensors to trigger the plug, but for now, it’s just a bit of fun…

For those wanting to know more about these types of plugs, this one on Amazon just happens to be an ESP8266EX with a relay………just like those cheapy sonoff thingies (of which I have two!)

And someone’s already torn one down and documented it – for which I’m grateful as there’s another rabbit hole I don’t have to follow (for now)

Some useless information about power consumption measured with this plug


  • 9.5 to 16.6 Watts when Idle – probably a bit more / less when fans kick in?, lets call it 10 Watts
  • 58 Watts when heating the Extruder
  • 247 Watts when heating the Bed(Blimey!)
  • 291 Watts PEAK and settles at 281 whilst pre heating for PLA
  • 13.9 watts when driving X left and right
  • 17.8  Watts when driving just Y / Bed
  • 13.4 Watts when driving Z up and down – which is a suprise really as I’d have thought it would be double X due to two motors
  • 261.4 Watts when Printing – (205 degrees PLA and 60 Bed)
  • alternates from 261.4 to 43 watts whilst printing

So, Overall, it’s not too power hungry…Lets call it 300 watts peak.

Electricity is about 35p per KWh here…..

if you have a 10 hour print, using 300 watts (peak), that’ll cost you about 33p in electricity! in practice, it’ll actually be a bit less as the heating elements aren’t on all the time, they cycle on/off to maintain the temperature!

Summary, run the printer as much as you want!, it’s less than 4P an hour here in the UK!


The importance of a Clean bed


Bad Bed Bad PLA

Use SOAP AND WATER………


I’ve a few successful prints under my belt now…..Pics another time……..

For the past few days though, this has been happening………Zero adhesion 😦

Continue reading “The importance of a Clean bed”

Wanhao Duplicator D9 – MK10 Extruder issues – Teardown and….a 3D model

After having a few minor issues with filament slipping and prints generally being a bit crappy, I figured I’d take stuff apart, always helps me relax…

On the interwebs I was really unable to find any specific detail about the MK10 / MK11 type head that the Wanhao Duplicator 9 uses…

Continue reading “Wanhao Duplicator D9 – MK10 Extruder issues – Teardown and….a 3D model”

3D Printing – Practical stuff…a useful item made!

img_7366-1

Iteration……it’s all about trying, adjusting, trying again. from the first basic drawing on the left and the first print….right through to the Rev6 print (that’s now REV 7)

The tall bit pushes against the conservatory roof…the little ‘hook’ holds it in place on a small ledge, the long dangly bit presses against the wall and holds the LED strip….REV 7 increases the length of the sticky uppy bit on the right!

Back a few weeks ago, I purchased some LED strings to light up the conservatory during the winter months

LED STRING

Also purchased a few types of incredibly sticky double sided stuff….they just would not stick……The sticky pads stuck to the PVC windows just fine, but whatever teflon type material the clear IP tubes are made of, well, it’s better than teflon, nowt’ll hold that up….

Enter my shiny new 3D printer….A few brackets will hold them up nicely!

I used some Playdoh to get an idea of the outline of the PVC Ledge that I could clip some holders to…Made some drawings and knocked up something in Tinkercad

LED BRACKET

On the left is my first foray into 3D cad in nearly two decades….I’ve merged them to show the Rev7 bracket that i’m now to print….

I’m amazed really, in modern times, a 3D printer enables you to take some measurements….Create an item, try for fit….re-design the item, try again…..rinse, repeat….in just a few hours!. 7 iterations of trying, wiggling about an ‘guessing’ what needed changing and it’s done (till I improve and get to rev 10 :-P)

I’ve a long print running, but when it finishes, i’ll print up about 20 of these in clear filament and show the final product installed….can’t wait!


D9 Printer Bed Levelling – Done Right


bed-leveling-on-Ultimaker2-1.jpgFinally – Wanhao have released a decent firmware – V0.164(B)

Now, Levelling the bed…..


There’s LOADS of videos, methods ,etc out there….this way is SIMPLE, CONSISTENT and reliable

Make sure your printer head is clean and free from cooled plastic

MAKE SURE THE BED IS CLEAN...(I’m using baby wet wipes, but they dont’ seem to be the best, i’ll need to try isopropyl alcohol like the old timers are)

How to clean….Use a sponge, soap and water………that’s it!

1 – LEVEL the Z axis – use a ruler / visual marks on the back, whatever, make sure the bar is level

2 – Use the menu to go into  the LEVEL selection

3 – Get the Z axis offset correct by using a piece of paper so it’s just gripped by the head

4 – TURN OFF THE PRINTER (yes, TURN IT OFF, DO NOT CLICK NEXT)

5 – MANUALLY move the print head to CLOSE (maybe 10mm away from) to the corners…

  • Start on one corner – use the paper between the head and the bed…adjust the screw in that corner till it just grips.
  • Move to the next corner, repeat
  • repeat again
  • repeat again

6 – Go back and check each corner and tweak slightly if necessary

7 – Turn printer on and LEVEL THE BED IN SOFTWARE AS NORMAL……


Now, if you really want to be pedantic, you should do this whilst everything’s warmed up to your normal working temperatures!

That’s it, the end


D9 Firmware, Marlin

text-25

Whilst waiting for my quieter fans to arrive, A little more digging into the inner workings of the printer is called for – mainly to ensure that Estimated slicing times in Cura get a little closer to the real world slicing times that I’m seeing…

Overall, if Cura suggests it’ll be 6 hours, it’ll actually be a 9 hour print!

Continue reading “D9 Firmware, Marlin”

Calibration – Part 2……Again!

280 x 280mm

https://www.thingiverse.com/thing:2479352/

After figuring out that 20mm, just ain’t good enough to calibrate, I had a nose around on thingverse….

The largest ‘calibration’ thing I found was the above 280 x 280mm square……..Awesome, that’s good enough, close to 300mm too for maximum calibratory goodness…

Continue reading “Calibration – Part 2……Again!”

Calibration – WYISYG, Don’t use a 20mm Cube for accuracy!

img_7315https://www.thingiverse.com/thing:1278865


Lots of basic printing suggested that the front to back measurement was slightly off…so, finally I’ve decided to calibrate the printer….

By, printing a calibration cube! I’ll do it a little differently and record just a bit more information…I’ll measure 3 points for each axis, giving 9 points for the cube….

Continue reading “Calibration – WYISYG, Don’t use a 20mm Cube for accuracy!”

Levelling – Enter the VL53L0X -World’s smallest Time of Flight sensor ?

I need some way to quickly, ‘cheaply’, reliably and repeatedly to measure distance……

There’s quite a few ways of measuring distance, including the following, often used with arduinos / by hobbyists

  • Sound!
  • Ultrasound
  • IR bounceback
  • Visual / camera analytics
  • Laser

There’s some newish widgets out there nowadays called ‘time of flight’ sensors….similar to part of how Lidar works

Googling these, seems there’s a fairly cheap one called a VL53L0X…..

Continue reading “Levelling – Enter the VL53L0X -World’s smallest Time of Flight sensor ?”

Nozzles!….what a minefield

51NqYBk5p0L

Well, as i’m thinking ahead for a change and have purchased some glow in the dark filament

I’ve now discovered that the stuff is quite abrasive and I really should be thinking about getting some spare nozzles

A quick search for ‘replacement nozzles’ and….err

Continue reading “Nozzles!….what a minefield”

Amazing Price for the Duplicator 9 in the UK – £349 at Box – FREE DELIVERY

I picked mine up for £399 just over 3 weeks ago!.

already it’s dropped by £50………wow!!

https://www.box.co.uk/Wanhao-Duplicator-9_2327623.html


boxprice

I get no benefits at all by linking to these guys, just highlighting a superb printer (so far!) for a superb price here in the UK


Immediate upgrades – Better wheels x 6 for the Y axis Bed (open builds type, see my other posts) and a better blower fan – <£40 extra and it’s a superb, 24V printer