Spectrum Next Mini – SD card

The Xberry pi’s SD card slot location isn’t ideal when putting inside a Scale Next Mini.

With the HDMI, EAR and power sockets all aligned to the back of the case, the micro SD slot sits about 13mm too close to the rear from where the ideal location would be on the side of the Next. – As can be seen below

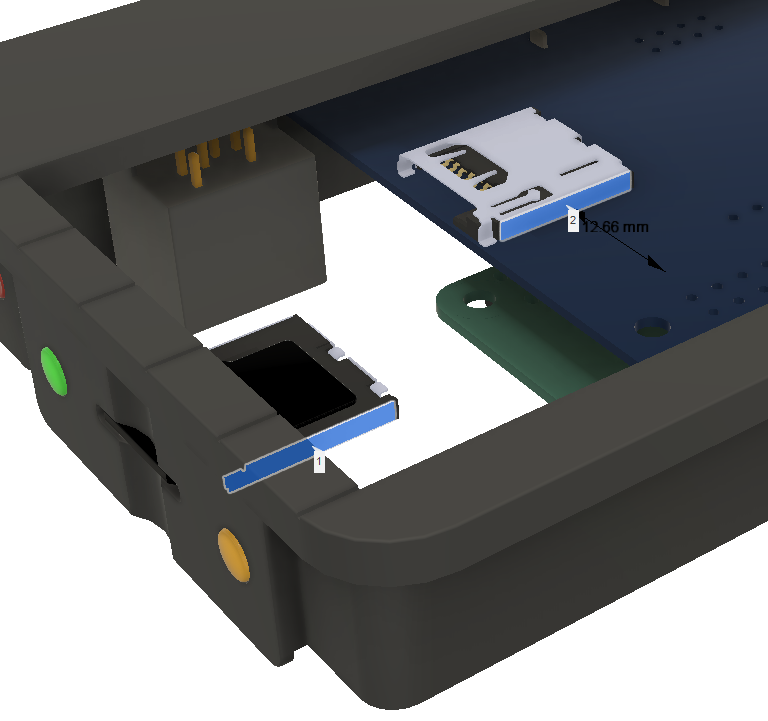
It also sits about 30-35mm too far from the side of the case. So, an adaptor is needed. You can buy these ‘micro Sd / TF extenders’ – But, none in just the right length (they’re close), nor in a slight offsetty-typey thingy.

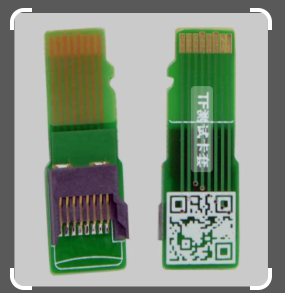
‘off the shelf’ Micro SD extenders

So, i’ve had to knock up yet another PCB!

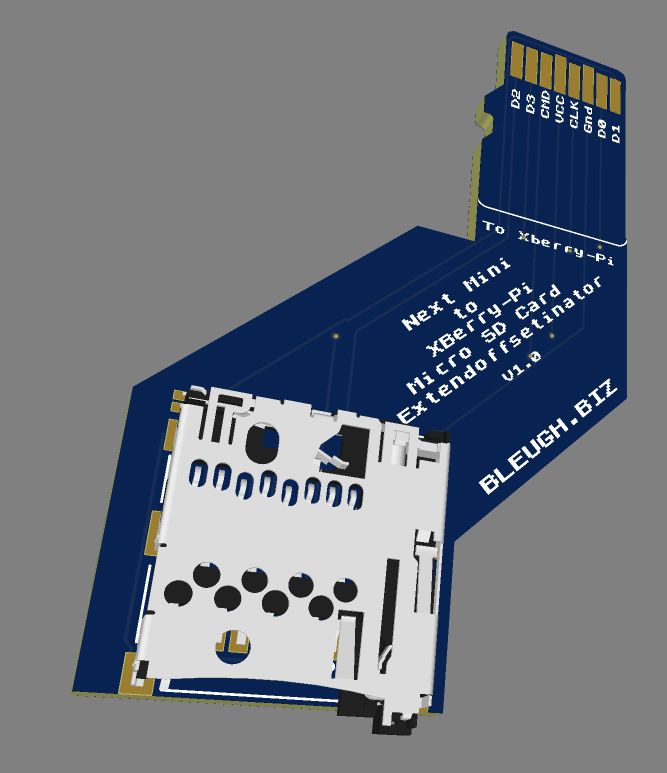
Presenting the SD card offsetor thingymajig.

Turns out there’s a few projects online that use 0.6mm thick or 0.8mm thick PCB’s to plug into a standard slot and extend out TF / Micro Sd cards. Micro Sd cards are 0.7mm thick though, and few ‘cheap’ PCB places seem to do that thickness…

I’m going to try both and see what happens. Seems most have success with 0.8mm.

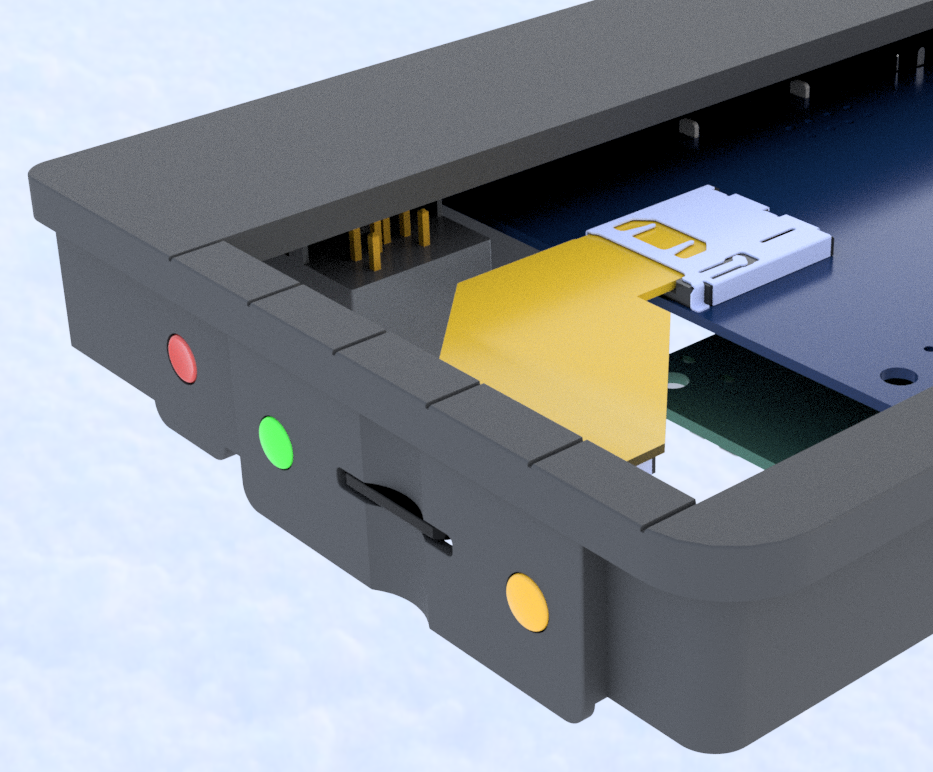
And, here’s the board sitting inside the Next Mini!

I suspect this board may change in size a little as it’s probably going to be easy to re-purpose it also for the 3 side buttons.

And, before you ask, Yep, all this is so that the Next Mini looks very close to the original, I think I’m close!

The reason my one looks ‘stumpy’ is that it’s exactly 50% of the length and width of the Next, but is exactly the same height!

Trying to be a perfectionist! (Next Mini)

It’s been a couple of weeks of iteration and maybe ten actual prints between these two prints!

In person, the difference is very notable. more subtle in pictures.

This is as good as it gets for a standard set of keycaps 🙂 I’m finally happy.

Now I can really get stuck into experimenting with getting those legends white! I have three ideas, one may be limited somewhat by the viscosity of water!

Spot the difference!

Anycubic Photon Print Bed drainer STL – posted to Thingiverse

Whilst developing the Commodore 64 mini keycaps and iterating the prints, it came clear that the caps are little buckets that hold quite a lot of resin.

I’ve been holding the keyboard over the tray to drain all this resin out, and it takes “ages”

So, when you can use CAD and have a few 3D printers , you go and spend time developing a widget to optimise the amount of time holding a build plate at an angle!

And by “spend time”, and “optimise”, I mean, take longer doing in CAD than the total amount of time that would have been spent holding the bed in the first place

I present….

60 degrees! version 1

Total amount of time in CAD, and reworking, maybe 3 hours…

Total amount of time holding a bed to drain, maybe 3 minutes.

Number of beds to hold to recoup time in CAD…60!

So, after 60 prints, I’ll have broken even on the time invested in making the thing!

Here it is in action!

Version 1 wasn’t as optimal, it needed shifting over to the left by about 30mm to give far more clearance on the case for everyone not printing 25mm high keycaps to be able to use.

60 degrees, version 2!

Released on Thingiverse – right here – for free! works a treat.

Keycaps! C64 mini stuff

Doing some sideways progress now.

When planning something, always allow time for ‘unseen’ stuff, or even anticipated issues that probably show up but you hope they don’t.

Is that a banana in your c64 mini or are you just happy to see me?

I’ve had two partially failed prints now, one fully expected and designed deliberately to see just how far I can remove supports or just how many I need to add

And, the one you see above. A large part of the bed failed to adhere so I stopped at 65%, just enough to recover the space bar…should have waited to 70% so I could grab a few of the bottom row also.

I’ve noticed slight warping in all prints but haven’t been that concerned till this failure.

On the plus side though, my new pigment colours arrived !

Yes, it’s reddy. So, it’s not ready.

I now have a grip on how the colours mix and can iterate a little closer to the original brown now! It doesn’t help that I’m red/green colourblind so, matching brown, in the evenings , in the conservatory in non optimal lighting is probably a worst case scenario for me :-p

But, I can get close now and can get the wife to tweak the formula

One thing I’ve noted is that it can get expensive iterating colors in resin prints! I’m mixing 100ml at a time now, to start a new colour I’m dumping the old 100ml into my grey bottle! Can’t wait to see what colour that comes out as.

now, back to the print fails

First – Levelling. Seems my bed has become unlevel a little, so, I’ll need to re-level. This seems to be an excellent tutorial which i’ll follow.

Now, the warping. It’s something that I didn’t really experience much with my standard Filament printer, but now I clearly can see that it’s a common, but surmountable issue with Resin printers.

So, some research

I’ll need to re-design the space bar at least!.

https://www.3dhubs.com/knowledge-base/how-design-parts-sla-3d-printing/

And

https://www.3dhubs.com/knowledge-base/how-design-parts-sla-3d-printing/

I’d put a small re-enforcement bar all along the space bar which seems to have been an error and may well be causing more warping!

I’ll do another post with the re-design!

A Broken Rice Cooker :-( (3D Printing to the rescue!

Picked up a Tefal rice cooker when living in Australia. They’re superb, reliable and make great cakes

Highly recommend buying one 🙂

Our latching mechanism broke recently, requiring us to jam some weights on top to ensure the lovely cooked rice goodness continued……….

I Gone Dun Fixed it!

I’m getting a little better at Fusion360 now and my work with the C64Mini keyboard taught me enough about surface modelling to knock up this thingy 🙂

The old one’s at the top………the sticky outy bit snapped.

Now, another rabbit hole though……PLA is quite tough

….Until it’s warmed up.

….Rice cookers get a little warm…

It lasted a couple of weeks at least…

Picked up a roll of ABS, first time I’ll be using it, so wish me luck!. Also i’ll redesign those curves just a little better 🙂

Something on the side – Spectrum Next Blinkenlights

Back a few years ago (wow, it was that long!) I backed the Spectrum Next

Problem is, those lovely coloured bars over on the righta2ql6z-spectrum-next-black-1.39

They’re not LED’s………….

Well, I’m gonna try to fix it……

Continue reading “Something on the side – Spectrum Next Blinkenlights”

3D Printing – Upgrades – Here we go again!

Haven’t even fully assembled the thing yet and I discover there are many upgrades

https://all3dp.com/1/20-must-creality-ender-3-upgrades-mods/

https://www.thingiverse.com/

many very cheap!, A few expensive, many quick, a few slower…..

I do however own a few Ikea Lack Tables

and being a little dissapointed that my D9 was just too big to fit inside, I’m probbaly going to knock up a small stacker with my 3020 and ender 3! ………..when i’ll actually use all this crap for making stuff for the kids to play with, who knows!, still, the ‘possibilities’ are keeping me sane right now!


Continue reading “3D Printing – Upgrades – Here we go again!”

MGN12H crappy linear rail bearing blocks

What’s more sensible than spending $9USD on a basic, possibly non working chinese no-name bearing block?

……..Spending hours and a few quid trying to do ’em up!

Parts I’ll need…

  • 3/32 Drill Bit (or possibly 2.4mm if it needs some play) …………..[edit, turns out a 2.4mm is too small! Looks like 2.5 is the go]
  • 3/32 Ball bearings (bound to loose a few)
  • Something to drill with
  • something to clamp down the carriage without damaging it

After a few minutes with the calipers and Tinkercad, I give you………. Continue reading “MGN12H crappy linear rail bearing blocks”

Bad prints – Grr, the importance of cooling

img_7376

After the old soap and water life’s lesson and getting some fantastic print bed adhesion, the printer ‘developed’ * another problem……………


*by developed, I mean, ‘I’m an idiot’…..Probably…………..[just scroll to that bit below to avoid a few paragraphs of waffle

Continue reading “Bad prints – Grr, the importance of cooling”

The importance of a Clean bed


Bad Bed Bad PLA

Use SOAP AND WATER………


I’ve a few successful prints under my belt now…..Pics another time……..

For the past few days though, this has been happening………Zero adhesion 😦

Continue reading “The importance of a Clean bed”

Calibration – WYISYG, Don’t use a 20mm Cube for accuracy!

img_7315https://www.thingiverse.com/thing:1278865


Lots of basic printing suggested that the front to back measurement was slightly off…so, finally I’ve decided to calibrate the printer….

By, printing a calibration cube! I’ll do it a little differently and record just a bit more information…I’ll measure 3 points for each axis, giving 9 points for the cube….

Continue reading “Calibration – WYISYG, Don’t use a 20mm Cube for accuracy!”