Spectrum Next Mini – All The Bits!

Another un-interrupted few hours of Laptop time and I’ve now gotten to the point where….All the stuff fits. Now it’s just small tweaks, printing and ‘production’ .

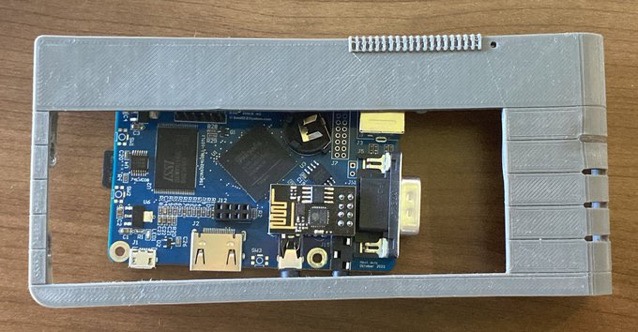
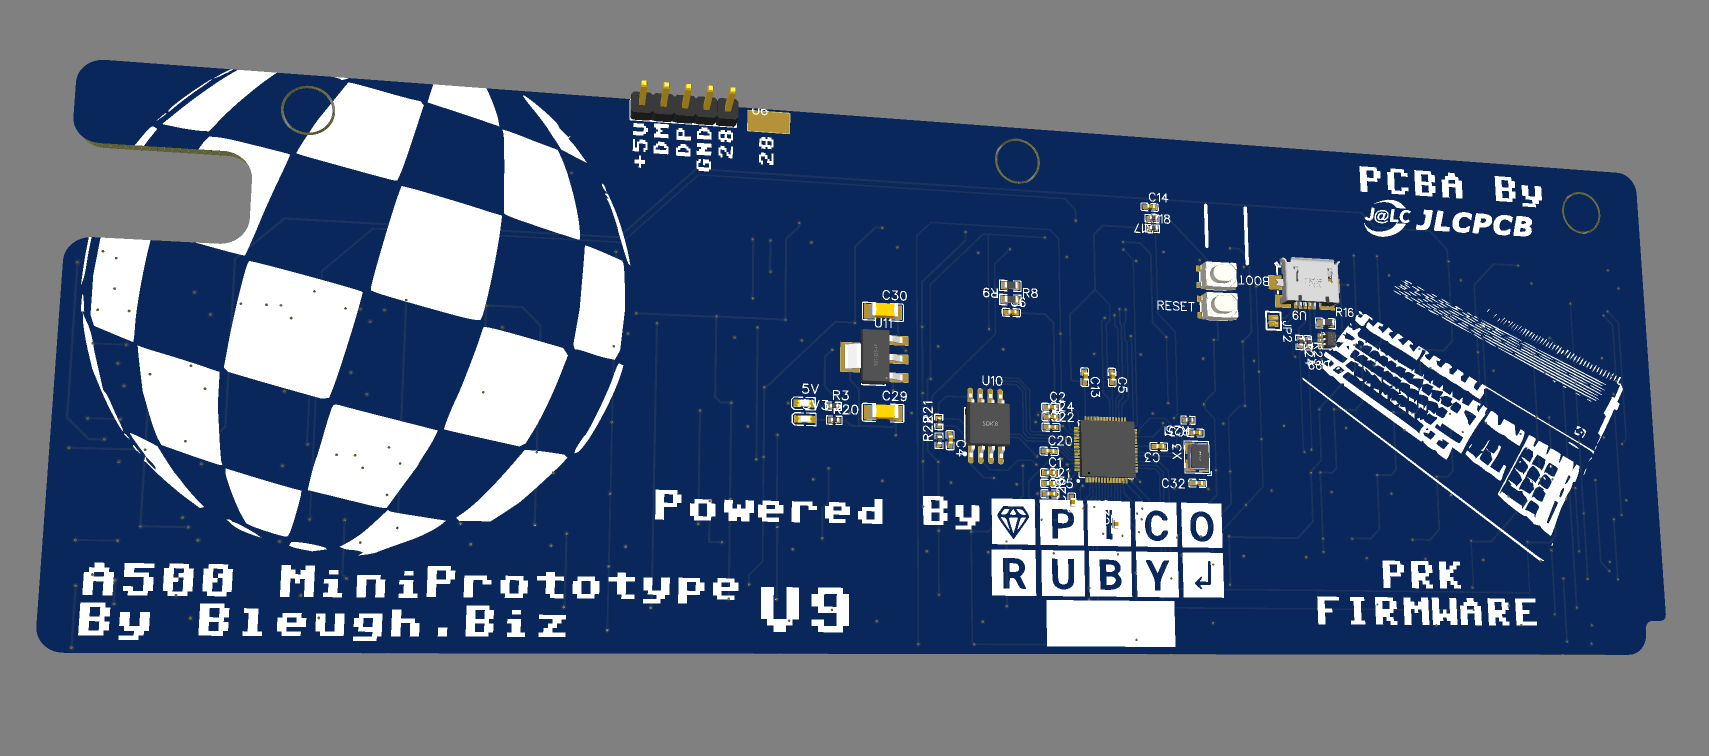
To get the PS/2 from the XBerry pi to the correct place on the rear of the case, I’ve put a small 6 pole ‘helper’ header over on the left.

Much Improved PS2 Port location – you can see the connector inside is now moved up and in-line with the other things!

I’ll then use just the small insert connector pins bit of the PS/2 connector and hand solder some wires for the first run. I might then make a fancy PCB for a final ‘final’ version

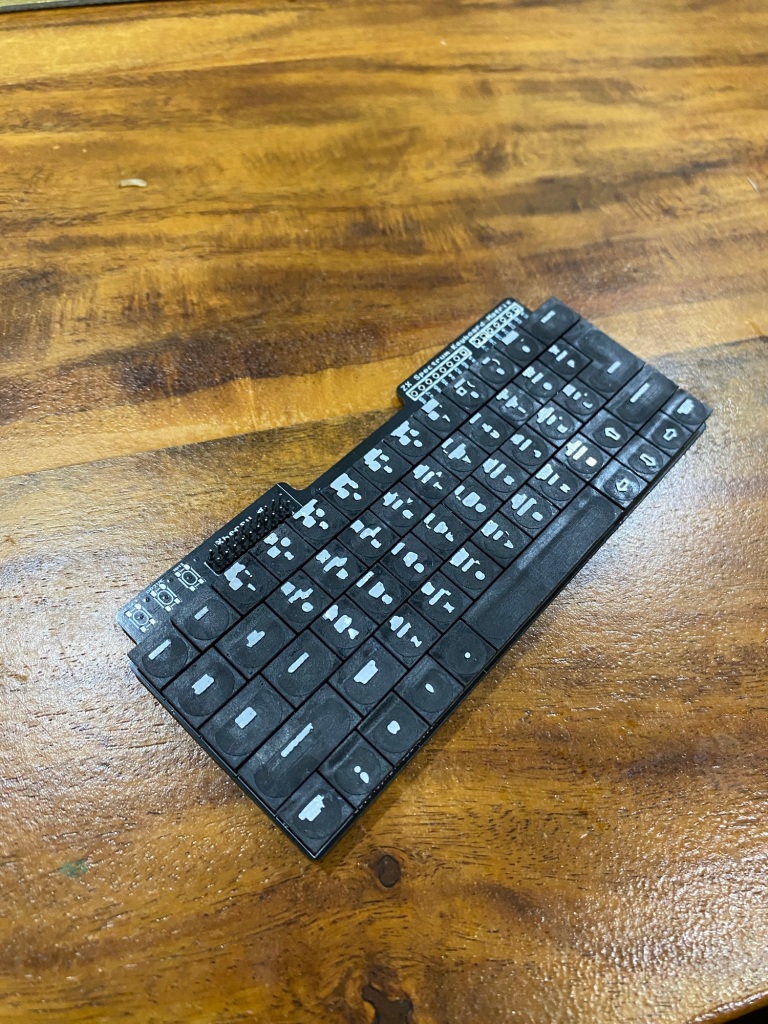
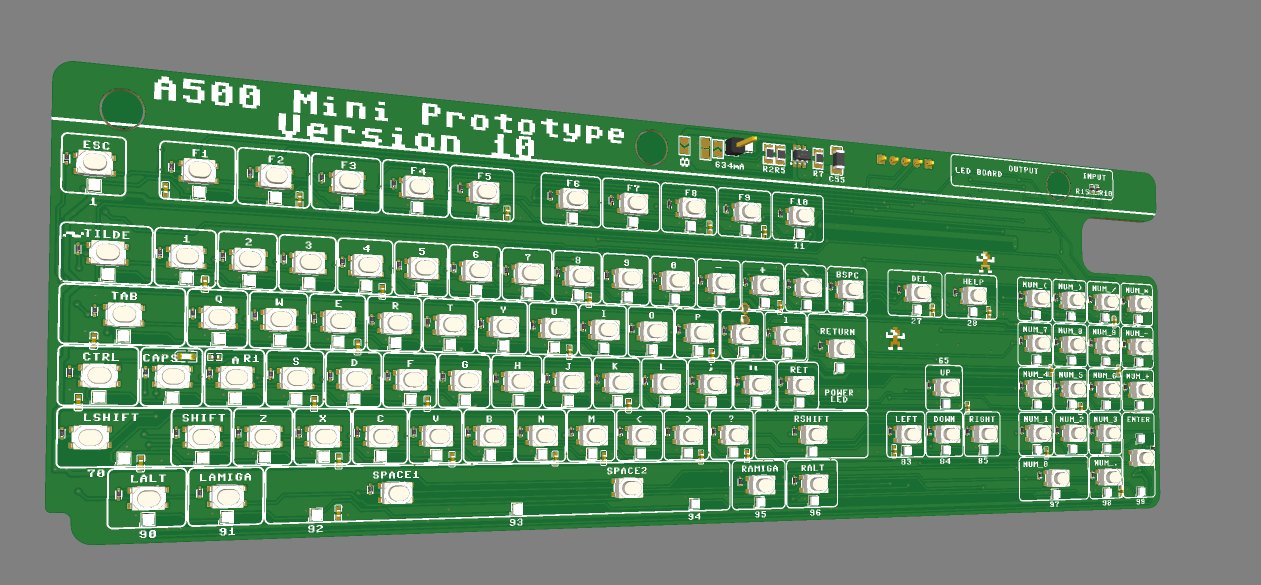
I’ve also now added a PS/2 port to the ‘rear’ of the keyboard PCB to save having a 4th custom PCB. For those that want ‘just a keyboard’ i’ll not be populating the rear side components (other than the Pi pico)

I’m now happy enough to pretty much freeze any problem solving, everything’s been solved now, so it’s down to relatively minor clearance and fitting tests now!

I’ll no doubt] need a few small revisions anyway and I’m really itching right now to make this thing Physical so soon, i’ll start using the 3D printers again, and be able to start back on the A500/ C64 and Blinkenator development!

For the Next Mini – some stats

Three Custom PCB’s seems to do the trick.

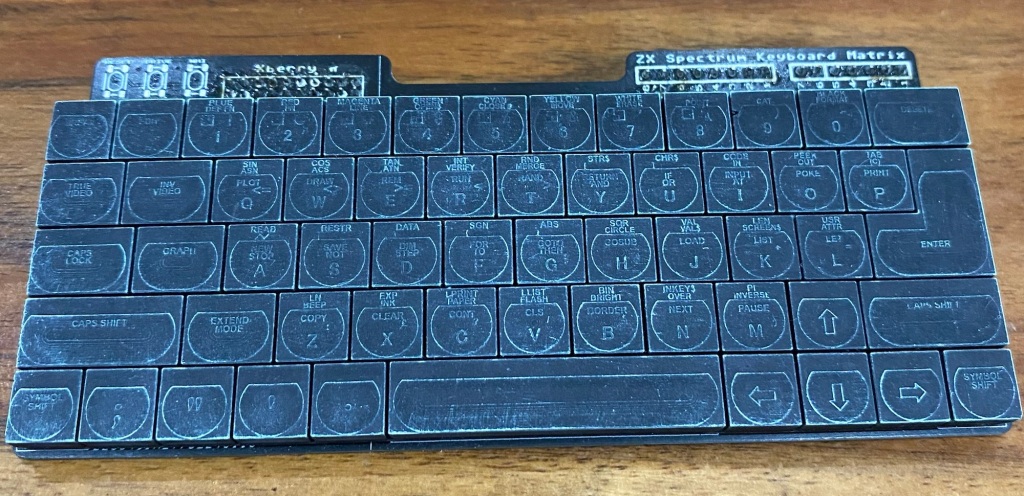
One Keyboard PCB (Duh!)

One Joystick Adaptor
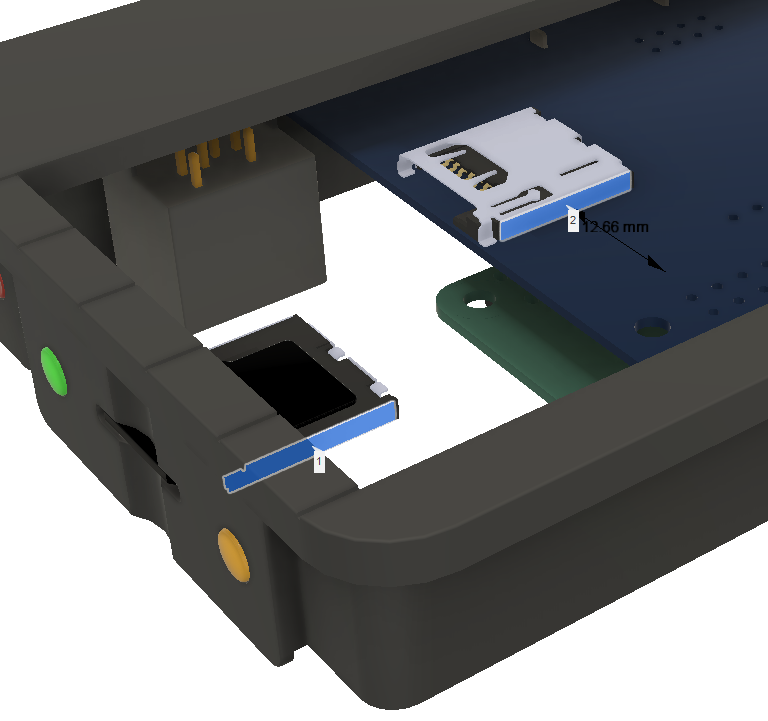
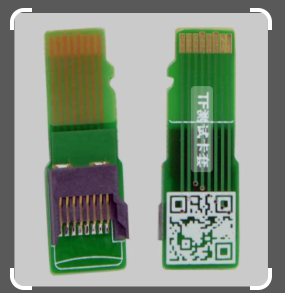
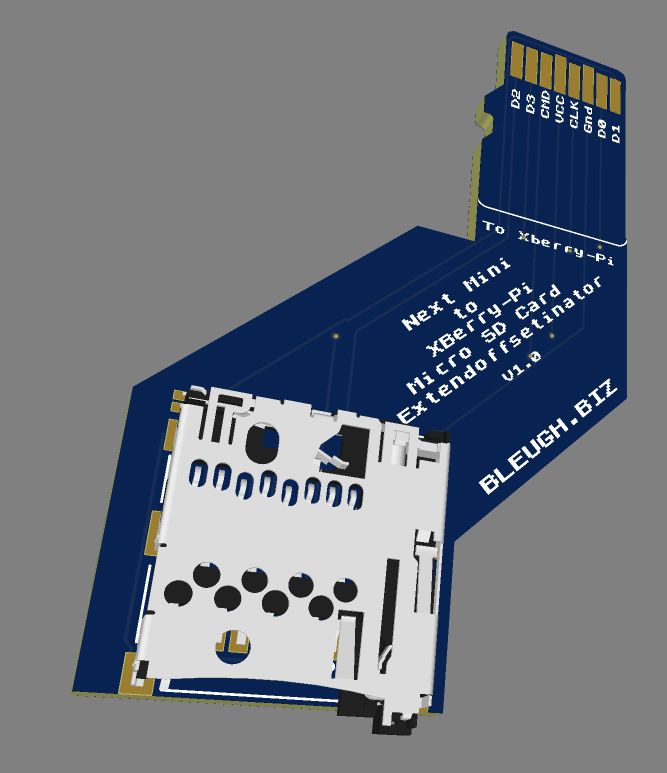
One SD Card Adaptor

One Pi Pico

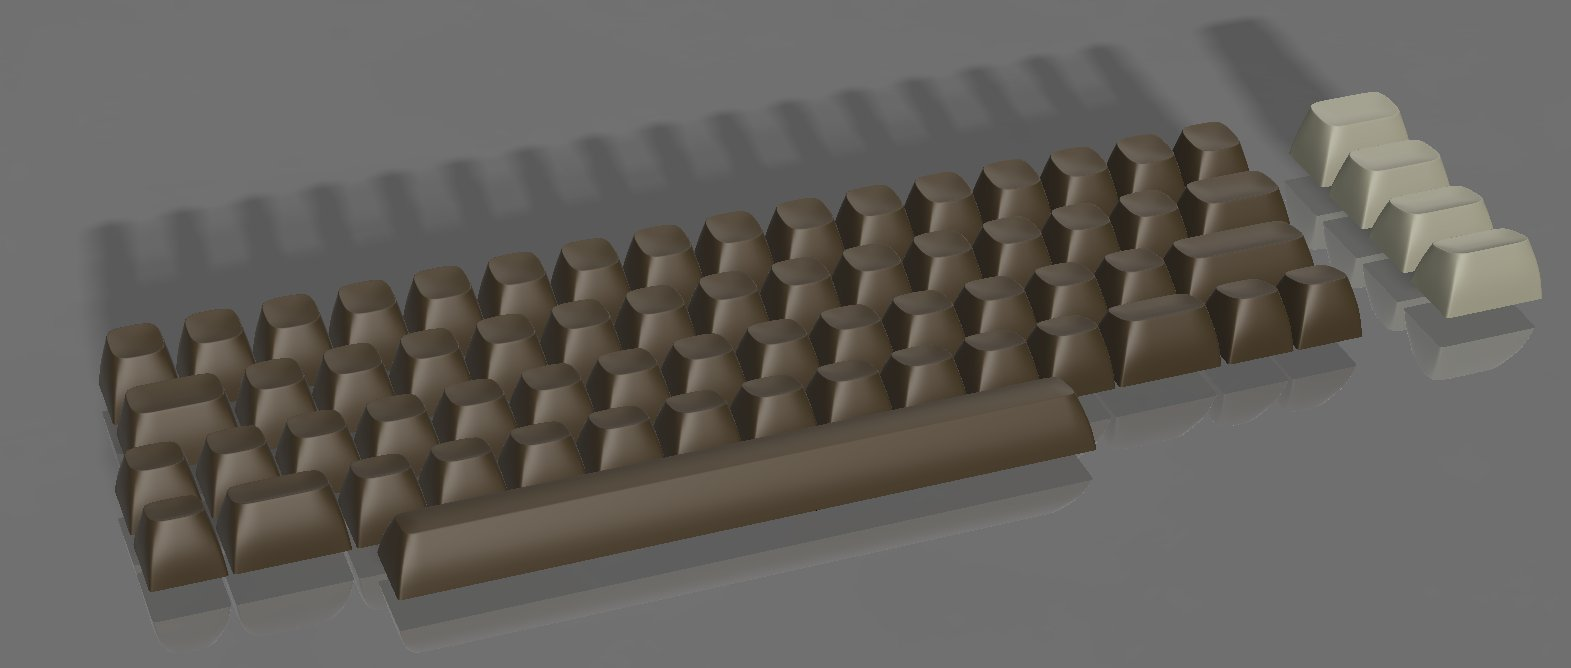
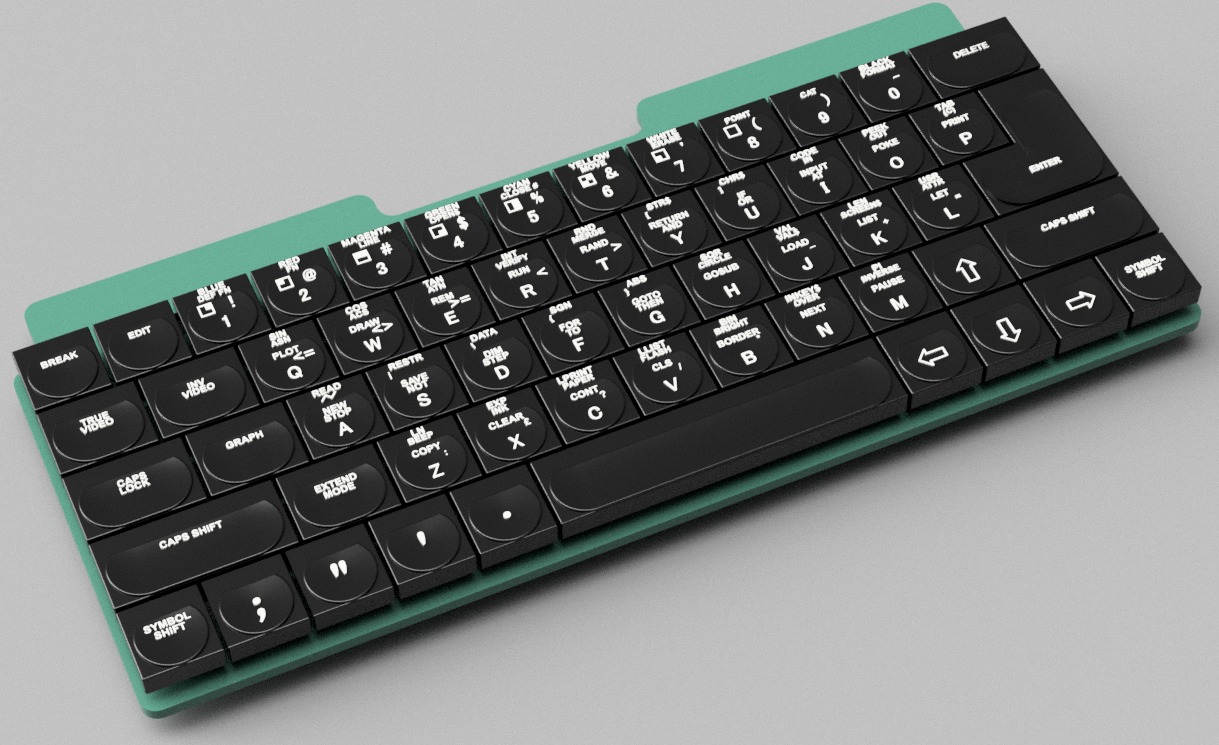
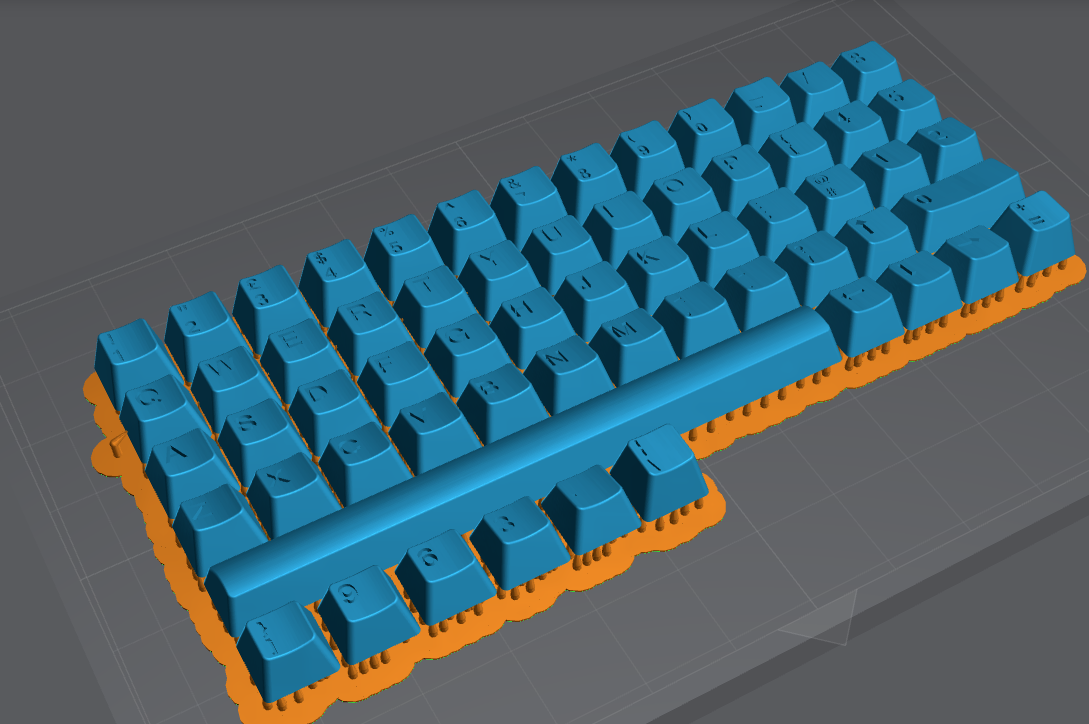
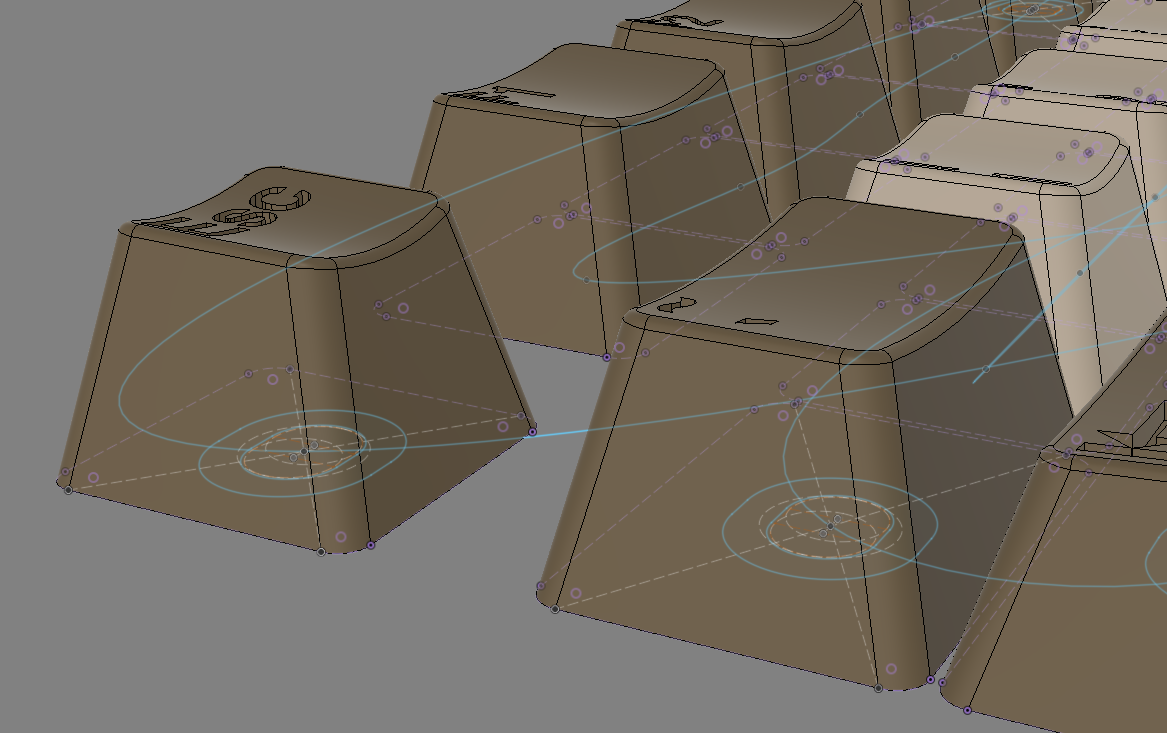
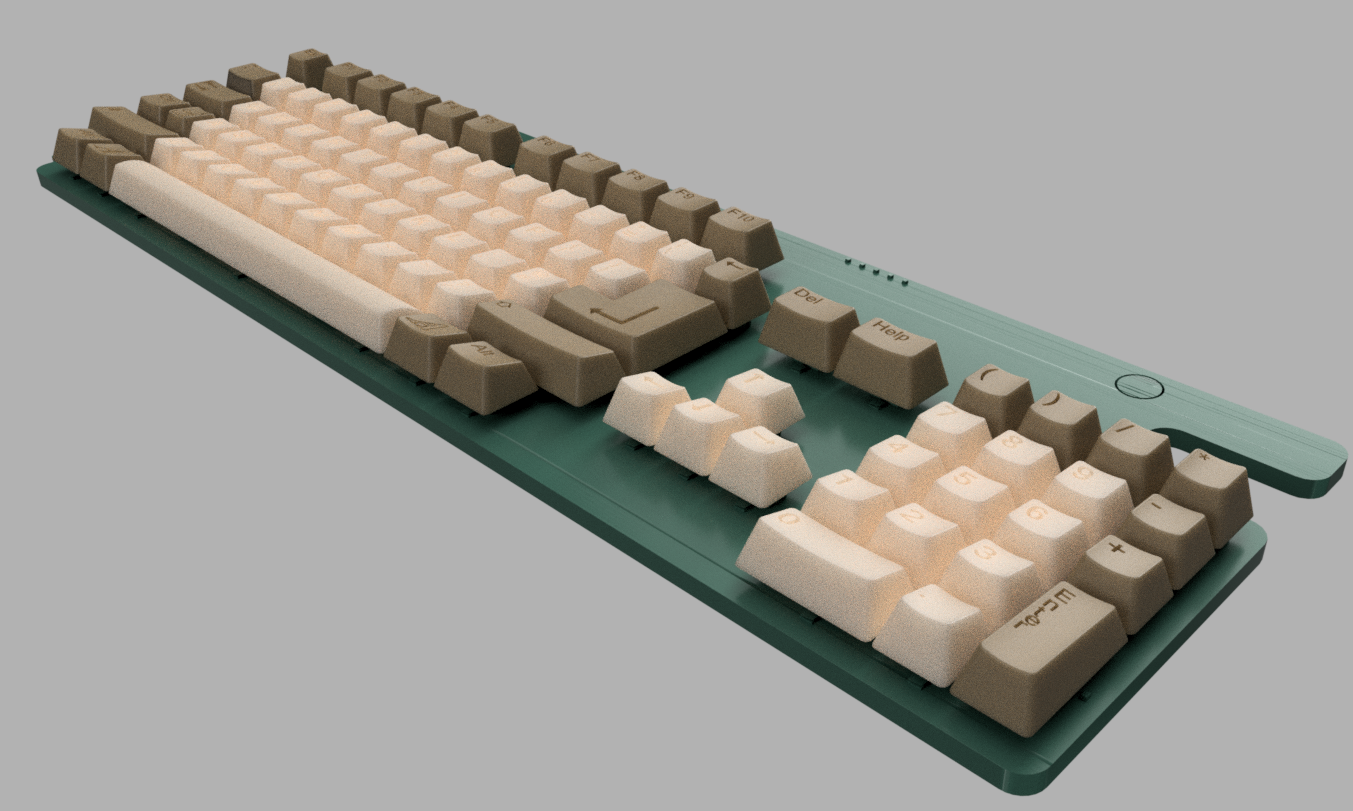
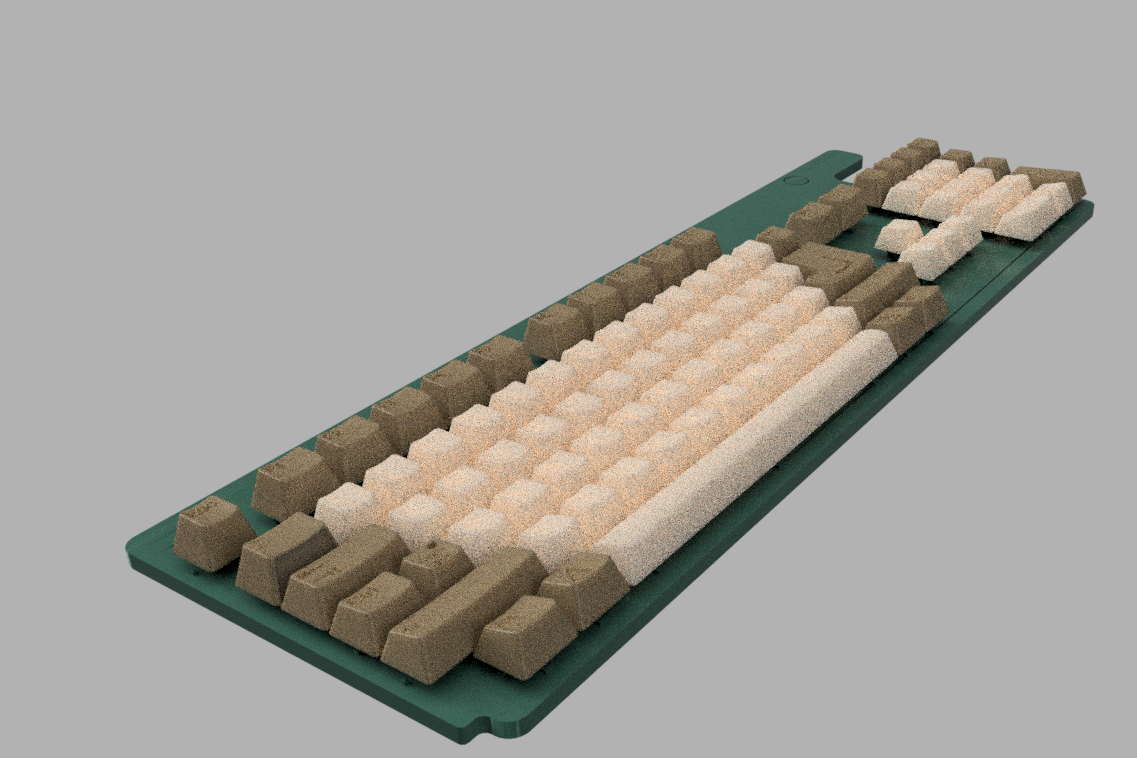
Nearly 70 3D printed parts in Six colours

The new tall switches and PS2 port – on the keyboard now
Some silk screen tidying needed

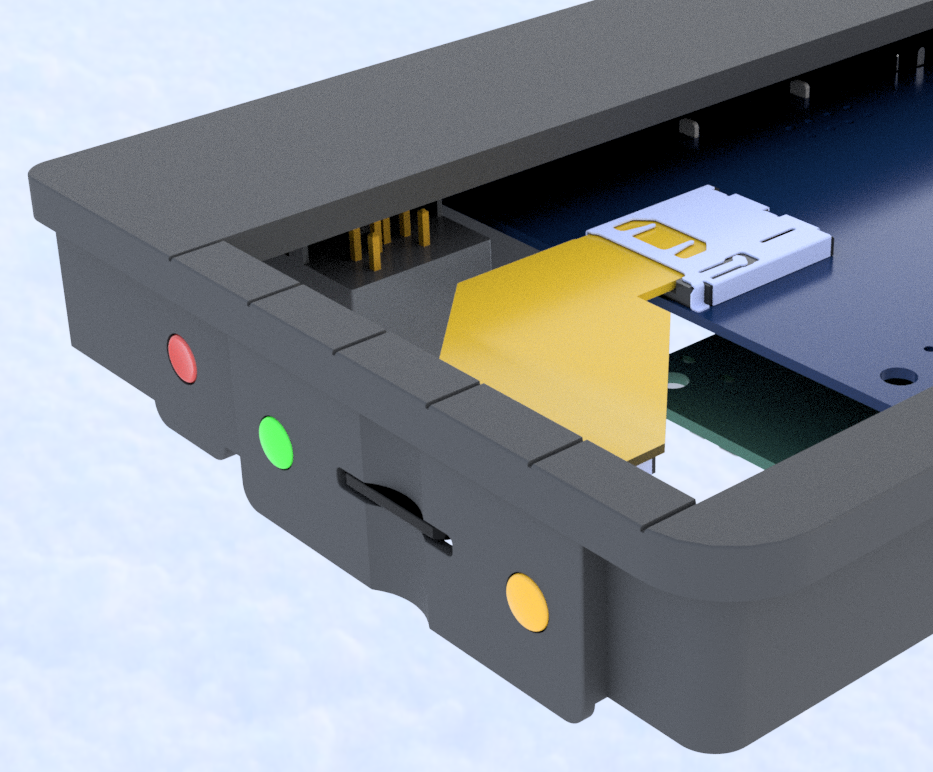
The two new PCB’s in Yellow – The ‘internal’ DB9 won’t be present on the Next Mini – it’s just there for a standalone product idea

Spectrum Next Mini – SD card

The Xberry pi’s SD card slot location isn’t ideal when putting inside a Scale Next Mini.

With the HDMI, EAR and power sockets all aligned to the back of the case, the micro SD slot sits about 13mm too close to the rear from where the ideal location would be on the side of the Next. – As can be seen below

It also sits about 30-35mm too far from the side of the case. So, an adaptor is needed. You can buy these ‘micro Sd / TF extenders’ – But, none in just the right length (they’re close), nor in a slight offsetty-typey thingy.

‘off the shelf’ Micro SD extenders

So, i’ve had to knock up yet another PCB!

Presenting the SD card offsetor thingymajig.

Turns out there’s a few projects online that use 0.6mm thick or 0.8mm thick PCB’s to plug into a standard slot and extend out TF / Micro Sd cards. Micro Sd cards are 0.7mm thick though, and few ‘cheap’ PCB places seem to do that thickness…

I’m going to try both and see what happens. Seems most have success with 0.8mm.

And, here’s the board sitting inside the Next Mini!

I suspect this board may change in size a little as it’s probably going to be easy to re-purpose it also for the 3 side buttons.

And, before you ask, Yep, all this is so that the Next Mini looks very close to the original, I think I’m close!

The reason my one looks ‘stumpy’ is that it’s exactly 50% of the length and width of the Next, but is exactly the same height!

New PCB – Next Mini DB9 Thingy

Had some issues fitting everything inside the Next Mini case…I’ve almost wanted to dump the exactly 50% scale idea…

The Problem – Commercial DB9 connectors are cheap and plentiful

They’re just simple joystick connectors after all..many 80’s and 90’s consoles / computers used them.

Here’s a quick preview of one of my browser windows after spending a good 4 hours hunting for ones I specifically need

The Xberry Pi just doesn’t fit very easily into a 50% Scale Next mini case without some jiggery pokery. I want the case to be easy to remove from the Xberry so this means no mods. It was practically impossible to find suitable connectors to mount on my interposer PCB. I needed slim, not sticking out too far and right angled PCB mount.

I found a few , but even their footprints clashed a little and it left the joystick connector just a bit too close to the coloured strips edge of the case…….

BUT, a quick brainwave – Do as i did with the C64-Mini!, mount solder bucket joystick ports on the edge of the PCB……

Voila

And, here’s where it sits in the grand scheme of things!

Here’s a render of the rear of the case

I’ve spotted that some Design For Manufacture will be needed on the rear of the case as the thickness below the DB9 is just over 1mm. The PS/2 port isn’t much more, so i’ll probably need to cut out the bottom of the cutout and put it on the bottom of the case. might leave an ugly seam if I get it wrong, but we’ll see.

Now, to tackle the PS/2 Connector and power LED. The Keyboard connector is proving problematic also due to lack of space, may have to get creative with yet another custom PCB!

A world first? Dual colour MSLA resin printed keycaps!

Ok, they’re not perfect yet…the process just needs a little dialling in.

I’ve googled a little, I really do think I’ve done something unique! Me, a mid 40’s Welsh bloke doing something no one else has…

I genuinely think this has never been done before…

Happy to be proven wrong 🙂

Spectrum next Mini – updates – almost there!

Have done a good amount this past week – Finally received the 2mm pitch ribbon cables so decided to test the boards……

…Aaand, something wasn’t correct – lots of keys jumbled up.

So, had to spend an hour or two diagnosing!…and to do that I knocked up a quick spreadsheet to cross reference. I had a similar problem with my C64 Mini, so suspected it was simple ‘swapped pins’ – But was worried as to how I goofed it up….

Continue reading “Spectrum next Mini – updates – almost there!”

Tiny keycaps – Spectrum Next Mini.

Spot the goof up!
Four by four makes one!

I’m going to write to those Fox’s Glacier Mints people and suggest they make tasty keycaps!

After two days of hunting, Found a paint scraper to remove the keycaps off the printer !

Also Bought some IPA to clean the keycaps up…

But…I’d forgot to actually prepare the slicer properly for printing.

I’d planned to just print straight on the bed without supports.

I forgot to remove the first base layers / brim / whatever it’s called so there’s no hole on the underside of the keycaps!

Ah well!

I’ll re-slice and reprint tonight, it’s an hour to print, so very quick to iterate!

Also, can’t find my curing station, and it’s raining today…d’oh!

It’s Alive! – The A500 Mini keyboard

Janky test rig.

After a few hours of fault finding, PCB bodging and praying for leniency from the magic-smoke letting out gods….

I’ve plugged the keyboard in to a somewhat nekkid A500 Mini.

Now I’m torn between carrying on working or owning all the high scores!

Heck, I could procrastinate heavily by firing up workbench and give the keyboard and mouse a really good seeing to!

But…I won’t!

The hardware is now fine, I’ve adjusted the schematic to fix the issues.

I’ve also done a little DFM and used larger, cheaper anti ghosting diodes due to finding issues with two of the teeeeny SOD-923 diodes preventing the CTRL and Left Amiga keys working.

Im now using a much larger SOD-323

(You can just about fit 5 smaller ones in the whole footprint)

These larger diodes should minimise Pick and Place issues at the PCBA company as they’re easier to grab and likley will have an easier soldering temperature profile when next to the relatively giant switches.

Larger diodes will also provide more test points , which makes testing easier and quicker!

When making large batches, every minute saved adds up quickly!

If I make 100…and testing time is reduced by 2 minutes due to adding diodes, that’ll be over 3 hours saves just on one test!

You can see how a weekend would quickly get eaten up and achieving very little!

Prototypes – Phew Silly mistakes – A500 Mini

Always knock up prototypes before doing bigger numbers of PCB’s

Had a bit of a quandry doing some quick rough testing on the A500 Mini keyboard – some keys just don’t work!

Keyboards are generally made of a simple matrix of ‘rows and columns’ – so spotting patterns in faults makes diagnosis much easier.

Here, most of the missing keys are on Column 2 in the schematic! – so, clearly there’s an issue somewhere with Column C

Which goes to this pin on the raspberry pi

So, using the scope to quickly check all the buttons – seems that ‘something’ stops after button I to prevent button O working……..

Had a quick nose at the schematic and………..(i’ve circled the missing thing)

Yep, I’ve missed the connection between the switches!

Also, i’ve missed another connection or two elsewhere i’ll guess, looking at that 1,2,3,4 buttons not working

Why was this missed?

I’m partly lazy….

Rather than design a whole new symbol and footprint for the switch, I re-used an old symbol – meaning, in the schematic, the switch looks like the below…..

Pins 1&2 are joined internally, as are 3&4 – so really it doesn’t matter if they’re joined on the schematic or not…..

Unless……..you run out of space on a dual layer PCB to join all of the nets up, and you know they don’t matter, so, you ignore the Design Rule Checks (DRC)

I did, thinking that I’d cleverly pick everything up myself!…

But, clearly I didn’t

So lesson is – setup for success – make the schematic correct, don’t do shortcuts, else you’ll increase the chances of failure!

Fortunately, a few small bodge wires can easily fix these silly mistakes for the prototypes and Beta test versions

Prototype keyboards incoming

Woooo!

Should be here next week, not long till I find out how badly I’ve cocked them all up and how much work needed for a re-spin for production!

I purchased 2000 switches so can re-spin and re-test one, possibly two depending on which one (the Amiga needs 500 switches for 5 keyboards, spectrum needs far fewer!!)

Exciting times, now gotta get off my bum and fire the resin printers up.

Yep, these are WORKING keyboards for the

The A500 Mini Amiga

The C64 Mini Commodore 64

And

The Spectrum Next Mini (an Xberry Pi case) which is a 50% X &Y (100% Z) scale next mini styled case.

Third’s the charm! – more C64

Tad hungover on new years day, plenty of time to ruminate, so…decided to work on the last (which is the first!) of the keyboards…had a solid 4 or 5 hours to myself today so made a lot of progress!

Have finally made the C64Mini one in surface mount – Now i’ve sourced a supplier of suitable, well priced keyswitches, I’ve felt it worthwhile to re-visit this project…

What SMT means – Very little soldering needed for this prodcut. Just the Arduino pro-micro at this time.

I’m hoping this makes the kit much more accessible, many will put their hands up and state that the 600+ solder joins needed on the old one was ‘painful’….

Some pics!

Top of the board – based on the modified 4.1

Bottom of the board..

Next step is changing the schematic over to use the much more readily available Raspberry Pi Pico or even creating a dual footprint board so you select which microprocessor to use, either the 32u4/Arduino Pro Micro or the Raspberry Pi Pico.

Unsure how i’ll offer the kits, I may well just pre-solder the microprocessor on so it’s a truly plug and play kit!

Still have to route the board, which will take a couple of days.

Also have started re-designing the keycaps from scratch – the old CAD is nigh on impossible to manipulate due to being so complex (was my first complex CAD project after all), so it’s easier to start over – and…I’ve gotten this far after just a week or so of playing

Keycaps re-done – Just needs the lettering and symbols!

I’m hoping to get this finished in time to add to my batch order of Next Mini and Amiga mini prototypes

PCB’s finalised for Next Mini and A500Mini

Actual cash has been paid!

the 2000 custom switches are being sent to @jlcpcb, To use them all up, I’ve ordered 15 of the next mini keyboards to prototype

Front of the First prototype

Rear of the prototype

The rear of the Spectrum Next Mini keyboard has a Raspberry Pi Pico option – I’ll create a PRK keymap – this will allow people to use the device with USB ‘things’ like raspberry pi’s, PC’s or even the A500 Mini 😉

Without the Pico, it’ll work as a standard 5+8+2 next keyboard, or, for it’s main intended use – with the Xberry Pi’s 10×2 header.

Render of the prototype Spectrum Next Mini keyboard.

I’ve also ordered 10 of the A500 Mini Prototype – this one’s on version 10. it should be the final one before I can hit ‘production’ – everything fits, no reason why it won’t work. This revision just adds a little circuitry – which is easily bypassed if it doesn’t work

So, ETA – at some point in 2024!

Spectrum Next Mini Keyboard!

The Xberry Pi won’t fit in the Next Mini case ‘as-is’

So, I’ll do the east bit first and design up the keyboard to fit the Xberry pi’s headers.

This way, I’ll have a working next mini, just with a rather large raspberry pi shaped box next to it,

Kinda like a PC!

The easy EDA alignment of the keycaps for the switches to align the CAD
CAD aligned!
Next mini case is too small!
First run of aligned PCB

A500 Keycaps – ready for printing!

First iteration is now finished…there’s quite literally nothing left to do other than to slice and print…..then test fit, re-design and so-on

All the lighter beige keys!

and the Darker coloured keys

I’ve sliced these for my old school Anycubic Photon Mono – the original 2k one. It’s been super reliable. once tested, i’ll likley print these on the much larger Photon Mono-X – should be able to do 3 or 4 sets of lighter coloured keys at a time on that.

And the printers are all setup and ready to start too!…

Now to take the huge step of pouring some resin in, transferring the sliced files over and actually printing…..

Some other bits arrived for testing the new keycaps also! – it’s all happening (slooowly)…

New A500Mini keycaps – ready for prototype printing!

*any colour available as long as it’s beigey brown

Have spent the last week tweaking, adjusting…probably too much really. Likely i’m actually procrastinating about making this thing physical. The new stems and locking mechanisms are are all aligned and merged in with the keycaps!

There really ain’t too much left now on the keycaps. Some minor adjustments will be needed to the stem – It’s parametric – so I print, fit, adjust one parameter which changes all keycaps at the same time (unless something breaks) and re-print.

Have made final tweaks also to the main PCB – I’m on version 11 of revision 9 now!…Again, too many little tweaks here and there, I really must fire the printers up!

Till the next time!

Quick hack to align PCB and CAD

Quite chuffed with myself on this one

Alignment squiggles!

I’ve been tweaking away, adjusting the EDA (the PCB via EASYEDA) and the CAD (the keycaps via Fusion360)…There’s nearly 100 bits that need to line up for it to all go well.

Previously, with my C64mini kits design, i’ve broken out the vernier calipers , measured, tweaked, printed, measured, tweaked, printed…….until everything fits just right!

For the A500 Mini Amiga, the ‘about 43%’ scale means the keycaps are just too tiny to shove underneath my ‘go to’ 5.8mm x 5.8mm switches . In addition, soldering 60 odd switches, another 60 odd diodes, and the arduino is a tad arduous, so change was needed.
I’ve jumped to Surface mount style components

One advantage of Surface mount – Machine assembly – I’ll be buying in the boards mostly populated!.

The machines that assemble the boards use a file called a ‘pick and place’ file. Essentially a CSV file with co-ordinates!.

I had a ‘play’ with that CSV file, imported it into excel and plotted the co-ordinates

That looks suspiciously like a keyboard!

Imported them into Fusion as a Spline – The control points are the exact centre of where the keycaps are!

I just needed to align a point with one i’d already ensured was perfect in the CAD….and

The ESC key is perfectly located….

The centre of the stem of every key is perfectly aligned with every spline control point….Which comes directly off the Pick and place data of the PCB!

By overlaying the co-ordinates used to place the switches on the CAD model, I can now be very assured that the stems are located within the keycaps correctly, which are located within the keyboard…

or, in otherwords, it should all align, and hardly any 3D printing fake PCBS / jigs, samples, reworks needed…

Well, that’s the theory 😛

Lots of CAD work to do…A500Mini

Everything ‘fits’ – Lots of tweaking needed

I keep working with EASYEDA from JLCPCB as it’s just ‘easy’ and their PCB part has a great Export 3D model. For us metric types, just scale it by 0.254 and it fits like a glove. Very useful to align electronics and plastics in more complex models.

The new switches arrived

So, now to tweak the CAD to match the switches, make sure my resin printers are running, hand solder up a bunch of the sample switches onto an early revision keyboard, test and…

Keyboards! – Progress on the A500 Mini working keyboard.

Version 9 – Looks just like all the other ones 😛

Version 9 – Testing for interference fits – the support column is exactly underneath the RP2040 , D’oh!

Continue reading “Keyboards! – Progress on the A500 Mini working keyboard.”

A500 Mini – Twisty Keys Part Deux. Less room to wiggle

That was quick! – It’s amazing what’ll come to you at random moments.

I was looking at some uneven fitting panels on a car earlier today and wondered, ‘why can’t the gaps be smaller?’ –

Well, my first idea is to simply see what happens when the gaps between the keycaps are smaller……..

If there’s no room for keycaps to wiggle, they won’t wiggle! – that’s the theory anyway – Prototype is on the printer as I type.

If this ‘rough and ready’ bodge works, I can knock out a more elegant solution that’ll look much better :-), it’ll involve going right back to the beginning, but…ho-hum, such is the nature of product development!

The idea is currently on the printer! – this is a ‘zero cost’ solution that may reduce keycap wonkyness to a level that’s acceptable.

The next idea introduces double the 3D printed parts and some extra parts on top of that – BUT, it’s still a very cheap solution compared to the alternative…..

A500 Mini PCB’s have arrived!!

….and, already there’s a small electrical issue!

But….they fit perfectly, everything looks fab!

Now comes the long process of test and tweak 🙂

Pimped up A500mini!

The picture shows the three PCB’s and the 1 3D printed part inside the A500 mini.

Also shown is the A1011 mini which contains a single PCB and 3 3D printed parts.

And finally shown is the floppy disc, which is going to be two 2D printed parts, one 3D printed part and a single electronic component!

Phew…..it was only supposed to be a small single PCB keyboard kit, that’s feature creep for you

*disclaimer, it may also be able to be a single PCB kit to save people ££, other PCB’s will be options to ease installation and add features

Still Here Update – PETSCII

I Did a thing.

I had somewhat of a PETSCII induced fever over the past few weeks, one that needed Sating before I could practically start anything anew, or even continue anything existing……..

So, when I (eventually) re-make the C64Mini keyboard kit to be less soldery, more easierer and betterer, It may well have PETSCII on those keycaps, for all your milliputty smudgery into-ey goodness!

A500 Mini Prototype 2 is in the post, Every C64Mini keyboard kit and parts have been posted – I’m finally fully up to date!

A500 Mini Keyboard – Prototype 2 almost ready!

Three PCB’s are pretty mich ready to go . Just last minute checking, double checking, triple checking needed!.

I’m lacking lemmings on most of the boards, but be assured, there’ll be a few on the production units.

I’ve also now pretty much finished the keyboard CAD…Had to do yet another iteration to allow for the new switching mechanism i’m using..It’s really been a case of design, print, test, iterate, repeat!…Still ‘a few months away’ as always, Real life is taking over a little, meaning less time to perfect this lot.

On the plus side, I really do think this Prototype 2 will be ‘good enough’ for general testing and useage. Everything after prototype 2 will be geared to making it easier to install and add (or remove) extra features. Lots of pics after the break……………..

The USB Fake mini floppy adaptor

Continue reading “A500 Mini Keyboard – Prototype 2 almost ready!”

Oh No! – a quick segue

Made loads of ‘progress’ on the A500 Mini keyboard!

Yesterday evening was mainly procrastinating and playing around with Printed Circuit Board silkscreen / soldermask / copper to optimise the speed at which in could display many sprites simultaneously.

The result of too many hours.

Have a Lemming!!

A500 Mini Keyboard – prototype 2 – progress

I’ve tonight finished routing the new PCB and switches!

A lot of work has gone into this! It’s got some ‘extras’ , it’s also an expensive board at 4 layers , 1.2mm thick and nearly 100 switches!

I’ll get to designing the other 2 or 3 (maybe even 4!) PCB’s needed for the complete setup, then place a single order for them all, so it’ll be a few weeks till I can test this beast out!

If they work, Ill make few ‘special limited edition’ early ones to send out, I’ll not spoil the surprise extra features till they’re in my hands!

A500 Mini Keyboard – D’oh! More work needed

Nah, that looks crap.

Well, that’s a wrap for idea 1 – concept was ok enough, but…it’s no-where near good enough for a production run.

After half a dozen trial prints and practice fittings, I’m heading down another path.

The Many faults include

Keys fitting poorly to switches.

Keys not fitting on switches straight

Keys just not fitting onto switches at all

The attached picture sums it up really.

All is not lost however. This is something I had to trial, if it worked, it would have been cheaper and awesome.

I have a few ideas up my sleeve…My next option is right now, considerably more expensive, but has been underway for a few weeks now, I’ll reveal a bit more once the process is done.

On the plus side, the keycaps look great in Amiga Beige! – I’ll work on the darker caps another time.

The PCB layout works great, firmware works, so, really, it’s down to the thing that always was going to be an issue, the switches!

A500 Mini – part 8 – partly working keycaps and a small PCB reveal

First working keyboard keycaps are off the printer!
Only this bit to show as most of the print failed 😛

Well,, 3 prints failed, I’m trying to learn how to use my Photon Mono-X, so far mostly unsuccessfully, these were printed using a known good combination of Photon Mono and Commodore Brown resin 🙂 ….and still it partly failed!!

Next, I have to optimise the design for printing.
I’d added some features to make them work better, but, those features don’t translate to printing very well, D’oh! (That’s called not doing Design For Manufacture!).

Resin printing can be a hard beast to tame, especially when printing 94/98 individual items (98 if I can two keyboard types!!)

This first print is literally an ‘auto supports, Jab a few extras on, hope for the best’ quick test to prove the mechanics.
When the design is finished,
I’ll need to spend a couple of solid DAYS (maybe a weeks worth of evenings) adding thousands of supports MANUALLY to ensure every keycap comes off the print perfect!

That sounds a lot, but printing a single item is different than printing the same item hundreds of times, so it’s really worth the up front investment in time.

And, speaking of time, I’ve just clocked about 600 hours evenings and weekends, on this project now 😛

I’m rather happy otherwise, next week, I should have a full working keybaord to demonstrate 🙂

Another failure
Another failure!

And, the reveal, part 2

It’s here!!!!

A500 Mini II Part 6 – past the half way mark! – keycaps

Quite a lot of progress, but it doesn’t look like a lot of progress.

Firstly, I’ve had to re-do most of the keyboard CAD – I simply didn’t like the ‘blocky’ effect of the wider topped keycaps I’d created – as you can see below they look a lot more square in real life than they did in CAD…

I’ve now clocked well over 200 hours developing this set of keycaps, likley there’s going to be tens more tweaking / optimising!

So, along with the less blocky (more slopey) keys, I’d discovered my workflow in CAD had created tapered keys – the tops when viewed from above look like parallelograms, wheras the original Amiga had more square keys – it was quite a lot of work to alter this – see the parts below by the red arrows – the bottom bit is in towards the middle more than the top bit.

Tops not parallel with bottoms
Tops are parallel with bottoms
Continue reading “A500 Mini II Part 6 – past the half way mark! – keycaps”

A500 Mini Keyboardification Chapter two, part 4 – Moar CAD

Have been tweaking things over and over, I’m now finally ready to…….

3D Print a sample!
And, the complete thing

I think there’s going to be a few people out there actually using this keyboard in anger, so i’ve widened the keyswitch tops a little and added larger fonts to make it easier for someone to fill in some colour if they chose to do so.

Some other progress –

The Floppy Disc insert! – a FULL scale floppy disc fits well

I’ve refined the floppy disc insert thingy – I really think I can make this work – lots of parts on order so i’ll iterate this design over the coming weeks. I’ll do the first prints of the plug in module soon

Alternate View – with the Clamp PCB in black, the A500Mini PCB in green

Speaking of prints….

I knocked up a few of the mini-Floppies. Printed in various orientations to see if it’s even possible to do these. The best print is the angled one..Turns out, it’s going to be tricky as can be seen from the various failures above. Have re-designed a little and will run off some more sample prints soon. The supports on this one will be critical and hopefully not so wasteful as the C64mini keycaps were.

And, almost finally –

Here’s a collection of ‘stuff’ rendered so far. The Keyboard PCB is unfortunatley upside down – due to the way I started modelling stuff, no big deal but makes the renders look odd. The case slopes don’t need to be modelled (at this time) so i’ve just left them flat for now.

There’s loads of parts waiting to arrive in the post, but there’s also loads I can be getting on with, not just on this project, but on numerous others also!