
Ok, had a brainwave.
Too early to say if this is practical for production but it’s certainly worth a few weeks of experimenting 🙂

Ok, had a brainwave.
Too early to say if this is practical for production but it’s certainly worth a few weeks of experimenting 🙂
Have done a good amount this past week – Finally received the 2mm pitch ribbon cables so decided to test the boards……
…Aaand, something wasn’t correct – lots of keys jumbled up.
So, had to spend an hour or two diagnosing!…and to do that I knocked up a quick spreadsheet to cross reference. I had a similar problem with my C64 Mini, so suspected it was simple ‘swapped pins’ – But was worried as to how I goofed it up….


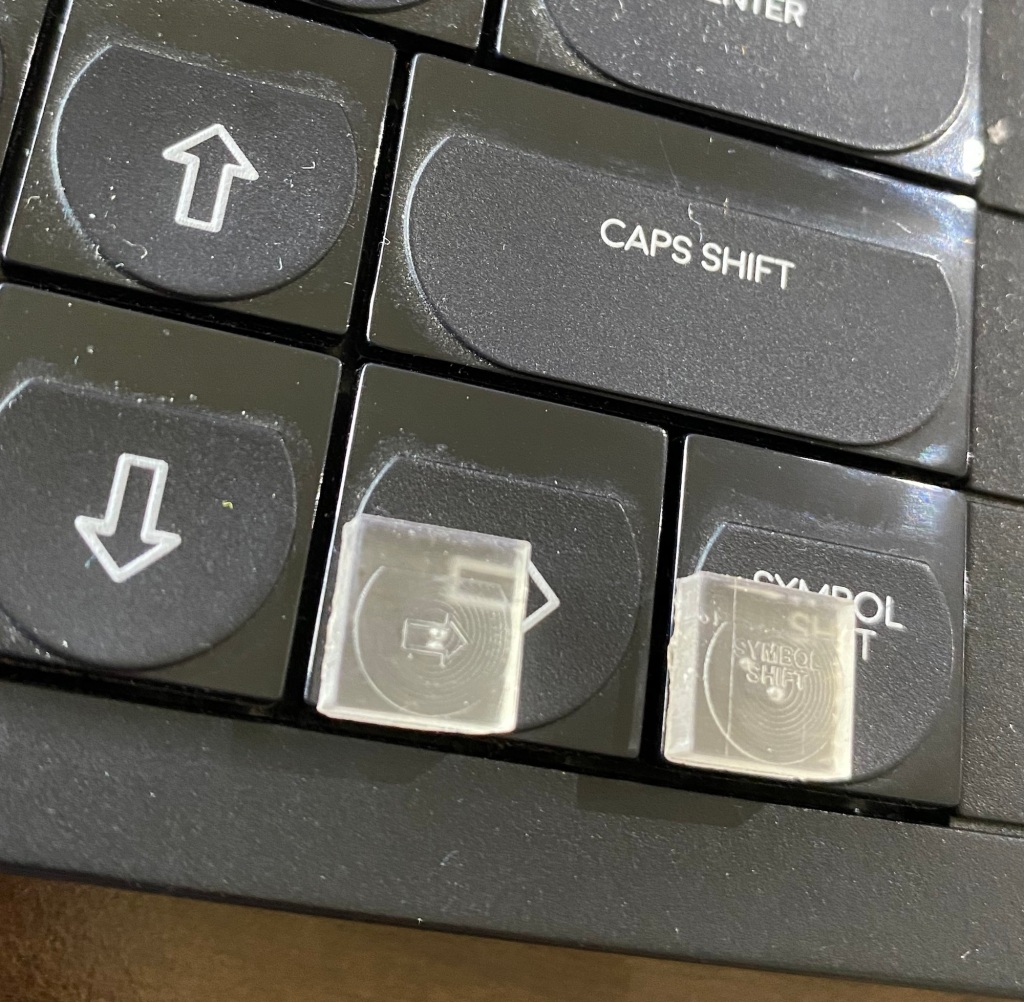
I’m going to write to those Fox’s Glacier Mints people and suggest they make tasty keycaps!
After two days of hunting, Found a paint scraper to remove the keycaps off the printer !
Also Bought some IPA to clean the keycaps up…
But…I’d forgot to actually prepare the slicer properly for printing.
I’d planned to just print straight on the bed without supports.
I forgot to remove the first base layers / brim / whatever it’s called so there’s no hole on the underside of the keycaps!
Ah well!
I’ll re-slice and reprint tonight, it’s an hour to print, so very quick to iterate!
Also, can’t find my curing station, and it’s raining today…d’oh!
After having a few failures over the past few months, i’ve tried a number of things to increase the print success rate.
The biggest improvement came from temporarily moving the printers out of the cold conservatory and into the much warmer living room.
That’s a bad thing to do on a full time basis as resin fumes ARE toxic .
There’s a whole slew of ways of heating up the printer. People have heated their rooms (expensive). Put the resin printer on a heated printer bed! (genius, and works). They’ve also cobbled together a bunch ‘o bits and made a heater. Probably the most elegant one i’ve seen is by Elegoo!
So, what does a person do when there’s pretty much a slew of commercially available suitable heaters for a 3D printer………
Yep, you go and roll your own!
I worry that the commercial ones may be too powerful I only need to raise the temperature around 10-15 degrees above ambient. Having seen friends use 50watt lamps in vivariums of much larger volume than my printers, I’ve figured a 50 Watt dedicated heater device should be more than enough….
So
I’m going with a https://hobbycomponents.com/sensors/684-w1209-temperature-control-switch W1209 Temperature control device and sensor
(thankyou to https://www.thingiverse.com/thing:3442165 for the inspiration for the product and also this Hackaday Article
a 50 Watt PTC Heater 12V DC https://www.amazon.co.uk/gp/product/B07SC15TK7/ref=ppx_yo_dt_b_asin_title_o01_s00?ie=UTF8&psc=1
(thankyou to the Elegoo heater thingy for this decision)
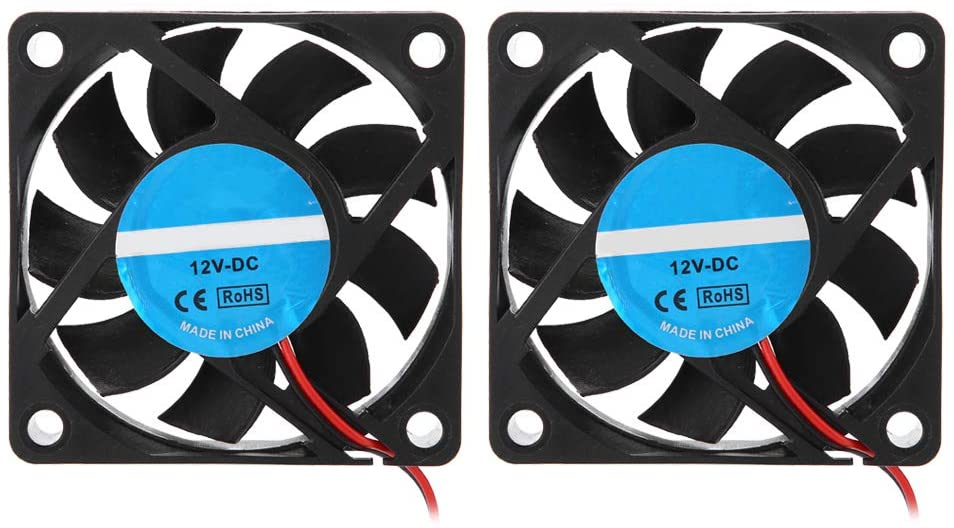
and a 60mm Fan https://www.amazon.co.uk/gp/product/B07HCGZ5FZ/ref=ppx_yo_dt_b_asin_title_o00_s00?ie=UTF8&psc=1
Thank ME for this one – I purchased 5 off 80mm Artic F8 case fans back in March last year for an absolute steal. With the intention of upgrading cooling on the Wanhao D9 and in anticipation of designing a small heater for the resin printers. I can’t find them, so, this pair was about the best deal I could find for quick delivery
This lot cost me about £20 in total – Not bad considering it’ll be twice as ugly as the £10 commercial units, which, at £10 will be delivered in March, which co-incidentally is about the same date that i’ll likley finish assembling this monstosity!, D’oh!
ah well……..


Now, All I need to do is create some sort of 3D printed enclosure to house ’em all, figure out how to route cables and voila, i’ll have a nice ‘thingy’
Note, this lot can be gotten for easily around a tenner total, if your patient. However, It’s cold NOW, so i can’t wait a few months for delivery (when, in the UK it’ll still be cold, just a bit less cold)

Apolgies for any delays and people waiting on keycaps….
I believe I may have reached the end of life of my original Photon Mono printer. for the past couple of months, i’ve been having more and more print failures, and have had no idea why. I’ve approached the problem analytically to figure out what’s wrong
Where it started –
I had a proper working file that ‘just worked’ – exposure about 35s for the first layers and about 1.8s per other layer
That started failing a bit. some keys were printing incomplete. I increased the exposure slightly and success again.
More fails, this time the first layers were coming off the build plate. I increased the exposure for the first 4 layers and success again.
had many minor creeps of fails, up to now where i’m at around 50s for the first layers exposure and 2.2s per layer.
I figured maybe the temperature in the conservatory is too low – Nope, iterating a bunch of exposures with the printer near the radiator in the living room also had nothing but failures.
So, after a good 15 fails in a row, many caused my me experimenting with extremes, i’ve given up with the photon mono. There’s many things it could be, but I’m thinking it’s feasible that the LCD has finally ‘failed’. I’ve easily gotten 1500 hours of actual print time on the thing – well over 1000 will be just the production keycaps at 6.5 hours each!
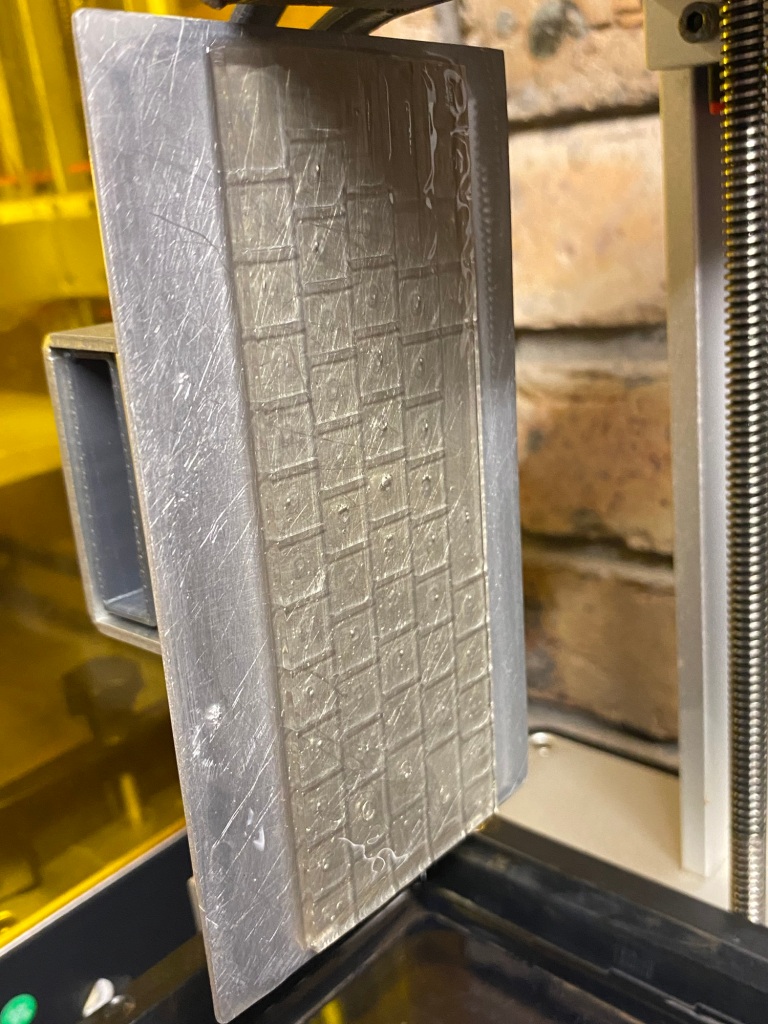
So, back to the point of the article. Those things in the picture are a R E R F TEST for my Anycubic Photon Mono-X
I’m dialling it in to start printing the keycaps. First one’s going right now (50% UV power, 3.5 seconds exposure and 45s base layer if you like to know)
IF this keyboard prints – fantastic, I can print two at a time in just 5 hours! i’ll be through the backlog in no time 🙂
Thanks for listening and sorry again for the delays!
Dean

These are the first brand new work that i’ve done on the inserts. The previous LED inserts were hacked out of the STL’s the ZX Spectrum Next team released some time ago. Since those early mesh hacks, i’ve learned quite a bit more on Fusion360 (which is entirely free for makers!)

Not much of an update, but i’m slowly picking back up on this again, personally, it’s been quite a tough 2021 , leaving me with little capacity to do fundemental development stuff…On the plus side, i’ve been in ‘something shiny’ mode for quite a while and literally shotgun blasting ‘fun’ ideas for new things, a few of which have been developed further and you’ll read about once they’re better baked.

By painted, I mean, found some old brown acrylic paint, mixed a little dried up acrylic white pen with some alcohol ink and Formed a browny grey.
It’s a 5 minute bodge job, but good enough for the trial. Now to decide to keep all the filament prints I’ve made, or, junk ‘em and switch to resin….
Soooo much more detail!

Used to love 90’s board games, and, as shown earlier, I fancy getting into Heroquest again…..But, NOT at the prices it’s fetching on eBay currently.
There’s a LOT of stuff to find out there, and more than enough to be able to fully re-create the whole game yourself.
BUT, as always, some of the things I’ve found, don’t really do it for me, so….My first in probably many…..A better Heroquest ‘Secret Door’ Tile….


Took some creative liberties with the door design, but there’s no way the printed tile can translate properly to 3D space unless someone has a particular wall height in mind….
This is just a merging of two other things found on Thingiverse, it’ll be a while before my organic 3D modelling skills get to the level needed to create the above from scratch
Now up on the Thingiverse – HERE
Used to play Heroquest back in the day. For some reason of late I’ve been a bit nostalgic about older games.
Well, 2nd hand ones are very expensive, and , I’ve got a 3D printer and access to Thingiverse…..so…

This is the first ‘fun’ thing I’ve printed, just for me 🙂 it’ll be the start of a large horde…it’s a bit of a rabbit hole this board game stuff.
Also, experimented a little with neon pigments as you may have spotted!
My New PCB’s will be here today! DHL shipping is expensive, but great when you need stuff quickly!
What this means – I should have general stock next week.
Timeline – I’ll get a test board built up this week. if that works, I’ll email out everyone who expressed an interest.
I’ll get everything kitted up through the week (time permitting) so I can get some posted this weekend.
The rest of the weekend will be spent kitting up everything I have so I can start selling again.
Sorry for the delay guys (and gals). Been a perfect storm of wrong components sent, big customs delays, non-functional PCB’s. I thought the ‘march’ timeline was generous and had plenty of padding in for worst case.
For general availability, i’ll be reviewing the price. Most things have gone up by over 20% in general (Brexit, Yaay), some have come down, and i’ve made some optimisations. These projects aren’t a get rich quick scheme for me, they’re just a way for me to get funds together to buy more tools and things to make more projects! It’s pretty much a cost neutral hobby 😛
One final update – Keycaps. I’ve started manufacturing and at the time of typing, I have sent out a few test items to kit owners. I’ll await some feedback before I can hit ‘go’ and make more.

Those are just some of the prints i’ve had to do to get to where I am now. This isn’t representative of the typical resin printing workflow. its generally a bit easier than this, BUT, I had to start from scratch, learning how to do everything, including stuff that hasn’t been done by others. AND I needed the base level print to be ‘perfect’ to avoid the need to paint them. There’s over 80 hours of actual printing time in this picture, on top of that, there’s the cleanup time, CAD time, setup time….these are the ‘successful’ failures, there’s almost as much again that i’ve binned due to total failures, where keycaps were unusuable for anything, not even experiments (as these ones have been used for). fortunatley most of those failures were caught early to avoid too much wasted resin….but when I get only 1 chance in the evenings on some days to quickly iterate, get the printer going, 1 failure can set me back a few days.
Anyways, now i’ve finalised everything……..
I’ve used an entire bottle of resin over the last couple of weeks making test manufacturing prints back to back to tune the process, changing nothing, just print, print, print… By that, I mean, it’s…
I’m now at about 70% success rate for good saleable keycaps. the other 20% have minor blotches or surface uniformity issues, so i’ll sell those discounted for those that are interested. I’m still getting about 1 in 1o that can’t be used in any way.
Good enough, and i’m sure i’ll get better as time goes on. Each print takes 6.5 hours – slow, but reliable and a 25uM layer height so about as good as it gets on resin printing for surface finish.
Each print also takes another 30 minutes or so to ‘turn around’ –
And, Pack some up, ready for posting I have! I’ve done a mix of ‘on the supports’ and ‘loose in bags’ to see how these things go. I’ve posted a couple to myself via friends overseas to see if they survive!. once I know what i’m doing is working, I’ll make them available for sale!

8 sets of keycaps ready to go, waiting feedback from testers before I can ship!
Hi All,
Quick update –
Arduino’s are still stuck in Limbo. I received 50 incorrect ones a long while back, ordered another 50 and they’ve been stuck somewhere in the UK for a couple of weeks now. I did order 10 locally at about 2x the price I normally pay to work through some of the waiting list, but that exhaused my supply of PCB’s
So, I ordered back at the beginning of February some more PCB’s
They arrived yesterday, and, I quickly soldered one up to test, so I can start ‘kitting up’ the keyboard kits.
I may have discovered an issue with the way that i’m Using EASYEDA, which has recently shown up in an EASYEDA update….it could be a bug, or a behaviour change, but, it’s B0rked my PCB!
This will set back the kit availability a couple of weeks whilst I address it and get new boards made. I know what the issue is, I can re-create it and have a work around to order more PCB’s so it’s no major worry

Here’s the C64 Keybaord matrix that i’m using. I’ve always used number prefixes for the number keys. i.e. if it’s A, I’ve used the PREFIX A, 1, Prefix 1, etc , etc.
Something changed in EASYEDA a couple of months ago which now means that Prefixes with a single digit number now all seem to tie their nets together.

Here’s the resulting PCB – Note, the nets for the centre pins are all the same!
I didn’t spot this in the one that I just had made! and despite the thoroughly heroic efforts of the JLCPCB staff to fix a couple of cockups i’d made , I have to now trash this batch .

Ah well, off to learn a little more about EASYEDA, quite an expensive mistake though, but this shows why, when you make changes, testing is important.
You can imagine how amused I was when I discovered that EVERY key worked on my board, except the number keys, which only typed 0 or 9 !
In other news – I purchased one of these
An Ultrasonic Cleaner – Dual Frequency 28KHz and 40KHz. I’ll do another post about it later.
All i can say now is WOW – No need for the wash and cure station now! – this thing superbly and consistently cleans the prints, giving a good surface finish. Prior to this, it was impossible to get a good finish on every key, every time. Now, i’m 4 prints in , and 3 are perfect, 1 is crap due to over-cleaning! I’m dialled in and ready for production

CAD is final now! The keycaps fit perfectly . They latch on with a push and can be removed!
Continue reading “Nailed it! Commodore 64 mini keycaps.”
Happy chappy this morning. They finished printing last night, my draining widget worked a treat – I’ll put a quick GIF up soon.
But, forgot about them until a mad panic at close to 1AM remembering I’d left them on the printer. With these, you can’t as the resin in the concave surfaces will part set in the morning and cause an uneven surface.
So, quickly washed them in IPA, regretted it immediately as it was dirty. Did another wash in IPA to clean the resin and straight to the hot water tap and larger bowl with a brush to clean off the bits. I’ll strain out the bowl later.
Final tweak needed now is the amount of grip to the switches themselves, shrinkage is variable at the moment, can’t go too small or keycaps may break when putting on, can’t go too big or they’ll be too wobbly and fall off.
May need to go middle ground and require a tiny blob of something sticky in each keycap, I’ll know soon enough!
The final hurdle for ‘good enough’ for me now is the space bar.
Every key prints lovely, except the largest one……Take a look

I’ve gotten all the ‘hard stuff’ over and done with first, or so I thought. Life’s taught me to generally avoid going for the low hanging fruit first, save the easy stuff for later when you need a boost.
Well, no matter what i’ve done (so far) in 12 iterations, have I been able to get a good looking space bar.
Now this has become my sole focus and roadblock for a successful print
Turns out that this is a combination of quite a few variables, I’ll list a few and probably follow up another time with clicky links and research
My solution……


Probaly waaay too many supports, but this way, each ‘sag’ will be between supports that are just 1mm apart.
I’ve also nearly doubled the wall thickness to about 1.8mm – from 1mm

Hopefully now, this is the last step, Colour’s good, CAD is good, Supports are good.
I’ve ordered 2 Litres of clear resin ready to go and have a colour that’s not exact, but close and, importantly , very easy to re-create
Resin8 Earthy Brown, 3 ‘blobs’ of the end of a lollypop stick to 100ml of resin. and Black, 1 blob.
– The Rich brown used previously was too red. I’ll experiment a little with more black when running off the final tests
https://www.resin8.co.uk/opaque-resin-pigment—earthy-brown-7468-p.asp
https://www.resin8.co.uk/opaque-resin-pigment—black-2383-p.asp
Coming soon!, more kits in stock, and Keycaps – March 2021!
Whilst developing the Commodore 64 mini keycaps and iterating the prints, it came clear that the caps are little buckets that hold quite a lot of resin.
I’ve been holding the keyboard over the tray to drain all this resin out, and it takes “ages”
So, when you can use CAD and have a few 3D printers , you go and spend time developing a widget to optimise the amount of time holding a build plate at an angle!
And by “spend time”, and “optimise”, I mean, take longer doing in CAD than the total amount of time that would have been spent holding the bed in the first place
I present….

Total amount of time in CAD, and reworking, maybe 3 hours…
Total amount of time holding a bed to drain, maybe 3 minutes.
Number of beds to hold to recoup time in CAD…60!
So, after 60 prints, I’ll have broken even on the time invested in making the thing!

Version 1 wasn’t as optimal, it needed shifting over to the left by about 30mm to give far more clearance on the case for everyone not printing 25mm high keycaps to be able to use.

Released on Thingiverse – right here – for free! works a treat.
Couple of successful prints! Rev 6 – just binging in stuff and hoping it works.
Rev 7 – more scientific and better CAD – all letters are now 0.2mm wider and deeper. This tiny tweak shows spectacularly well just how big a difference small changes can make.
Still some more CAD to do but soo close to final now!


And, finally, the print itself. I’ve learned that supports are critical here. Lots of them!
There’s actually as much material here in the supports as there is in the keycaps, but if you scrimp a little and try to reduce the amount, check out the top left of the picture below. I lost the return key and a few smaller keys were taken with it.
This was a calculated ‘risk’ by leaving this section to just have the standard auto generated supports, every other area had super dense supports.
There will be a middle ground, which I’m working on as I’d like to offer these cheaply…less resin used = cheaper to make!
Also, note the rest of the supports. THey are SO EASY to remove. When I offer these keycaps for sale, again to reduce cost, I’ll probably leave them as you see here. Makes for more robust packing and if you decide to paint them, you already have them held down on a convenient stand!

Not sure where i’ll be going with this post, but here goes anyway
The CAD work progresses with the C64 mini keyboard keycaps and it’s getting close to the time where I need to be thinking about the end-game, the final product.
I can’t imagine that people will be happy with some watery grey colour, most would prefer at least some semblence to the original breadbin colours!
So, i’ve done some quite considerable googling on the subject
.Also, figured that ‘painted’ stuff used to commonly use the RAL standard to determine a standardised final colour, maybe there’s a RAL colour for commodore keycaps? (there’s one for the case!)
Turns out that finding 3D printer resin in the colour you want, isn’t easy
Also, turns out that creating your own 3D printer resin colour also, isn’t quite fully tried and tested yet
https://formlabs.com/uk/blog/medical-dyeing-coloring-sla/
a fantastic website –
https://www.3dprintedminiature.com/how-do-i-dye-resin-3d-prints/
and, many, many more websites were found, all with various anecodes, photos and information regarding colourant successes and failures
One colourant kit that kept cropping up – https://monocure3d.com.au/product-category/cmyk-pigment-set/?v=322b26af01d5 The Monocure CMYK kit.
So, it looks like if I want to create my own coloured resin, I’ll have to mix it myself.
So, where to start, and what ‘stuff’ to use to dye it?
Turns out that there’s a distinct terminology that may need to be used to figure out just what the process of colouring resin is.
https://letsresin.com/blogs/articles/epoxy-pigment-guide-what-is-a-pigment-in-resin-art
has an interesting summary.
However, for my purposes of colouring the resin..
If I use a Dye – the colours will likley be a little more ‘washed out’
so, i’ll need to use a Pigment – essentially an insoluble bunch of micro particles that sit in suspension in the resin and create a solid, opaque colour! – AKA Dark brown.
So, off to google to figure out Pigments
There’s pigments for Casting resins, Resins, Acrylics, everything…..Except, a clearly stated pigment that’s suitable for 3D printer resin!
Infact, just what is 3D printer resin? what chemicals
I found this website which goes into some depth about resin types
Also found another website that does resin pigments in a range of RAL colours
BUT, they go on about Polyester, epoxy, and I’ve no idea if those things are compatible with the Anycubic resin i’m using
Another google and, I come up with a chemicals safety sheet for some Anycubic resins –
Listed there is a key component – which ends in “acrylate” and “diacrylate”…
so, looks like it’s an acrylic / acrylate based resin? can’t say i’m a chemistry expert but an Acrylate is a group of chemicals, so i’ll run with that
I need to look for pigments suitable for use in Acrylates!
But, err, is it an Acrylated Epoxy, or an Acrylated polyester, or even something else?
2-hydroxy-1-(4-(4-(2-hydroxy-2-methylpropionyl)benzyl)phenyl)-2-methylpropan-1-one is part of it!
Still clueless
https://pubchem.ncbi.nlm.nih.gov/compound/22019754#section=Depositor-Supplied-Patent-Identifiers
has some amazing information, including use in photosensitive resins
I’ve found a few websites that suggest urethrane acrylates are the go for UV resins
or, is it Acrylate polymers, or Epoxy Polymers!…….I’m leaning away from epoxy
SO, here goes – a quick google for Acrylate Polymer Pigment
I give up!. I’m just gonna buy a couple of bottles of ‘stuff’ and just see what works, This stuff seems to be recommended, and cheap, it’s brown and dyes resin, what can go wrong!
This one went well 🙂
Note, the intentional ‘stone effect’ finish 😉
Most people would say this was caused by an over excited person, whom, upon waking early and discovering the complete print decided to not follow the correct drying / washing procedures in order to get it finished quickly!
I, err, disagree…
Either way, I now have a firm grasp of changes needed to the CAD model and also the supports needed in the slicer.
Those changes are fairly substantial, so I expect it’ll be a little while for my next update, happy to document them also if anyone’s interested.


Wow! An exciting day today.
After quite some nervous trepidation, I finally shoved some resin into the printer and achieved my first ever resin print.
And, amazingly, some stuff worked! Significantly more than I’d expected to work actually.
I’ve been quite ‘scared’ of actually starting a print, I‘ve read too much about toxicity and fumes, which aren’t things you want with two young kids.
Well, I spent a couple of hours doing some final reading, and setting up on the dining room table. Levelled the bed, levelled it again. Shoved in the resin and…a Spectacular success for me!
I know the print failed mainly due to poor supports, some text is also too fine. Both were concerns with the cad and the slicer and easily fixed 🙂 there’s probably a dozen other issues I’ve not found yet also (it’s been 30 minutes since I wash and cured them fresh off the printer)
Next step, iterating, optimising . It could be done in a few weeks at print 3, it could be print 10 and take a few months , but now I’m over the first hurdle, onwards and upwards!!


Only some thoughts on this one –
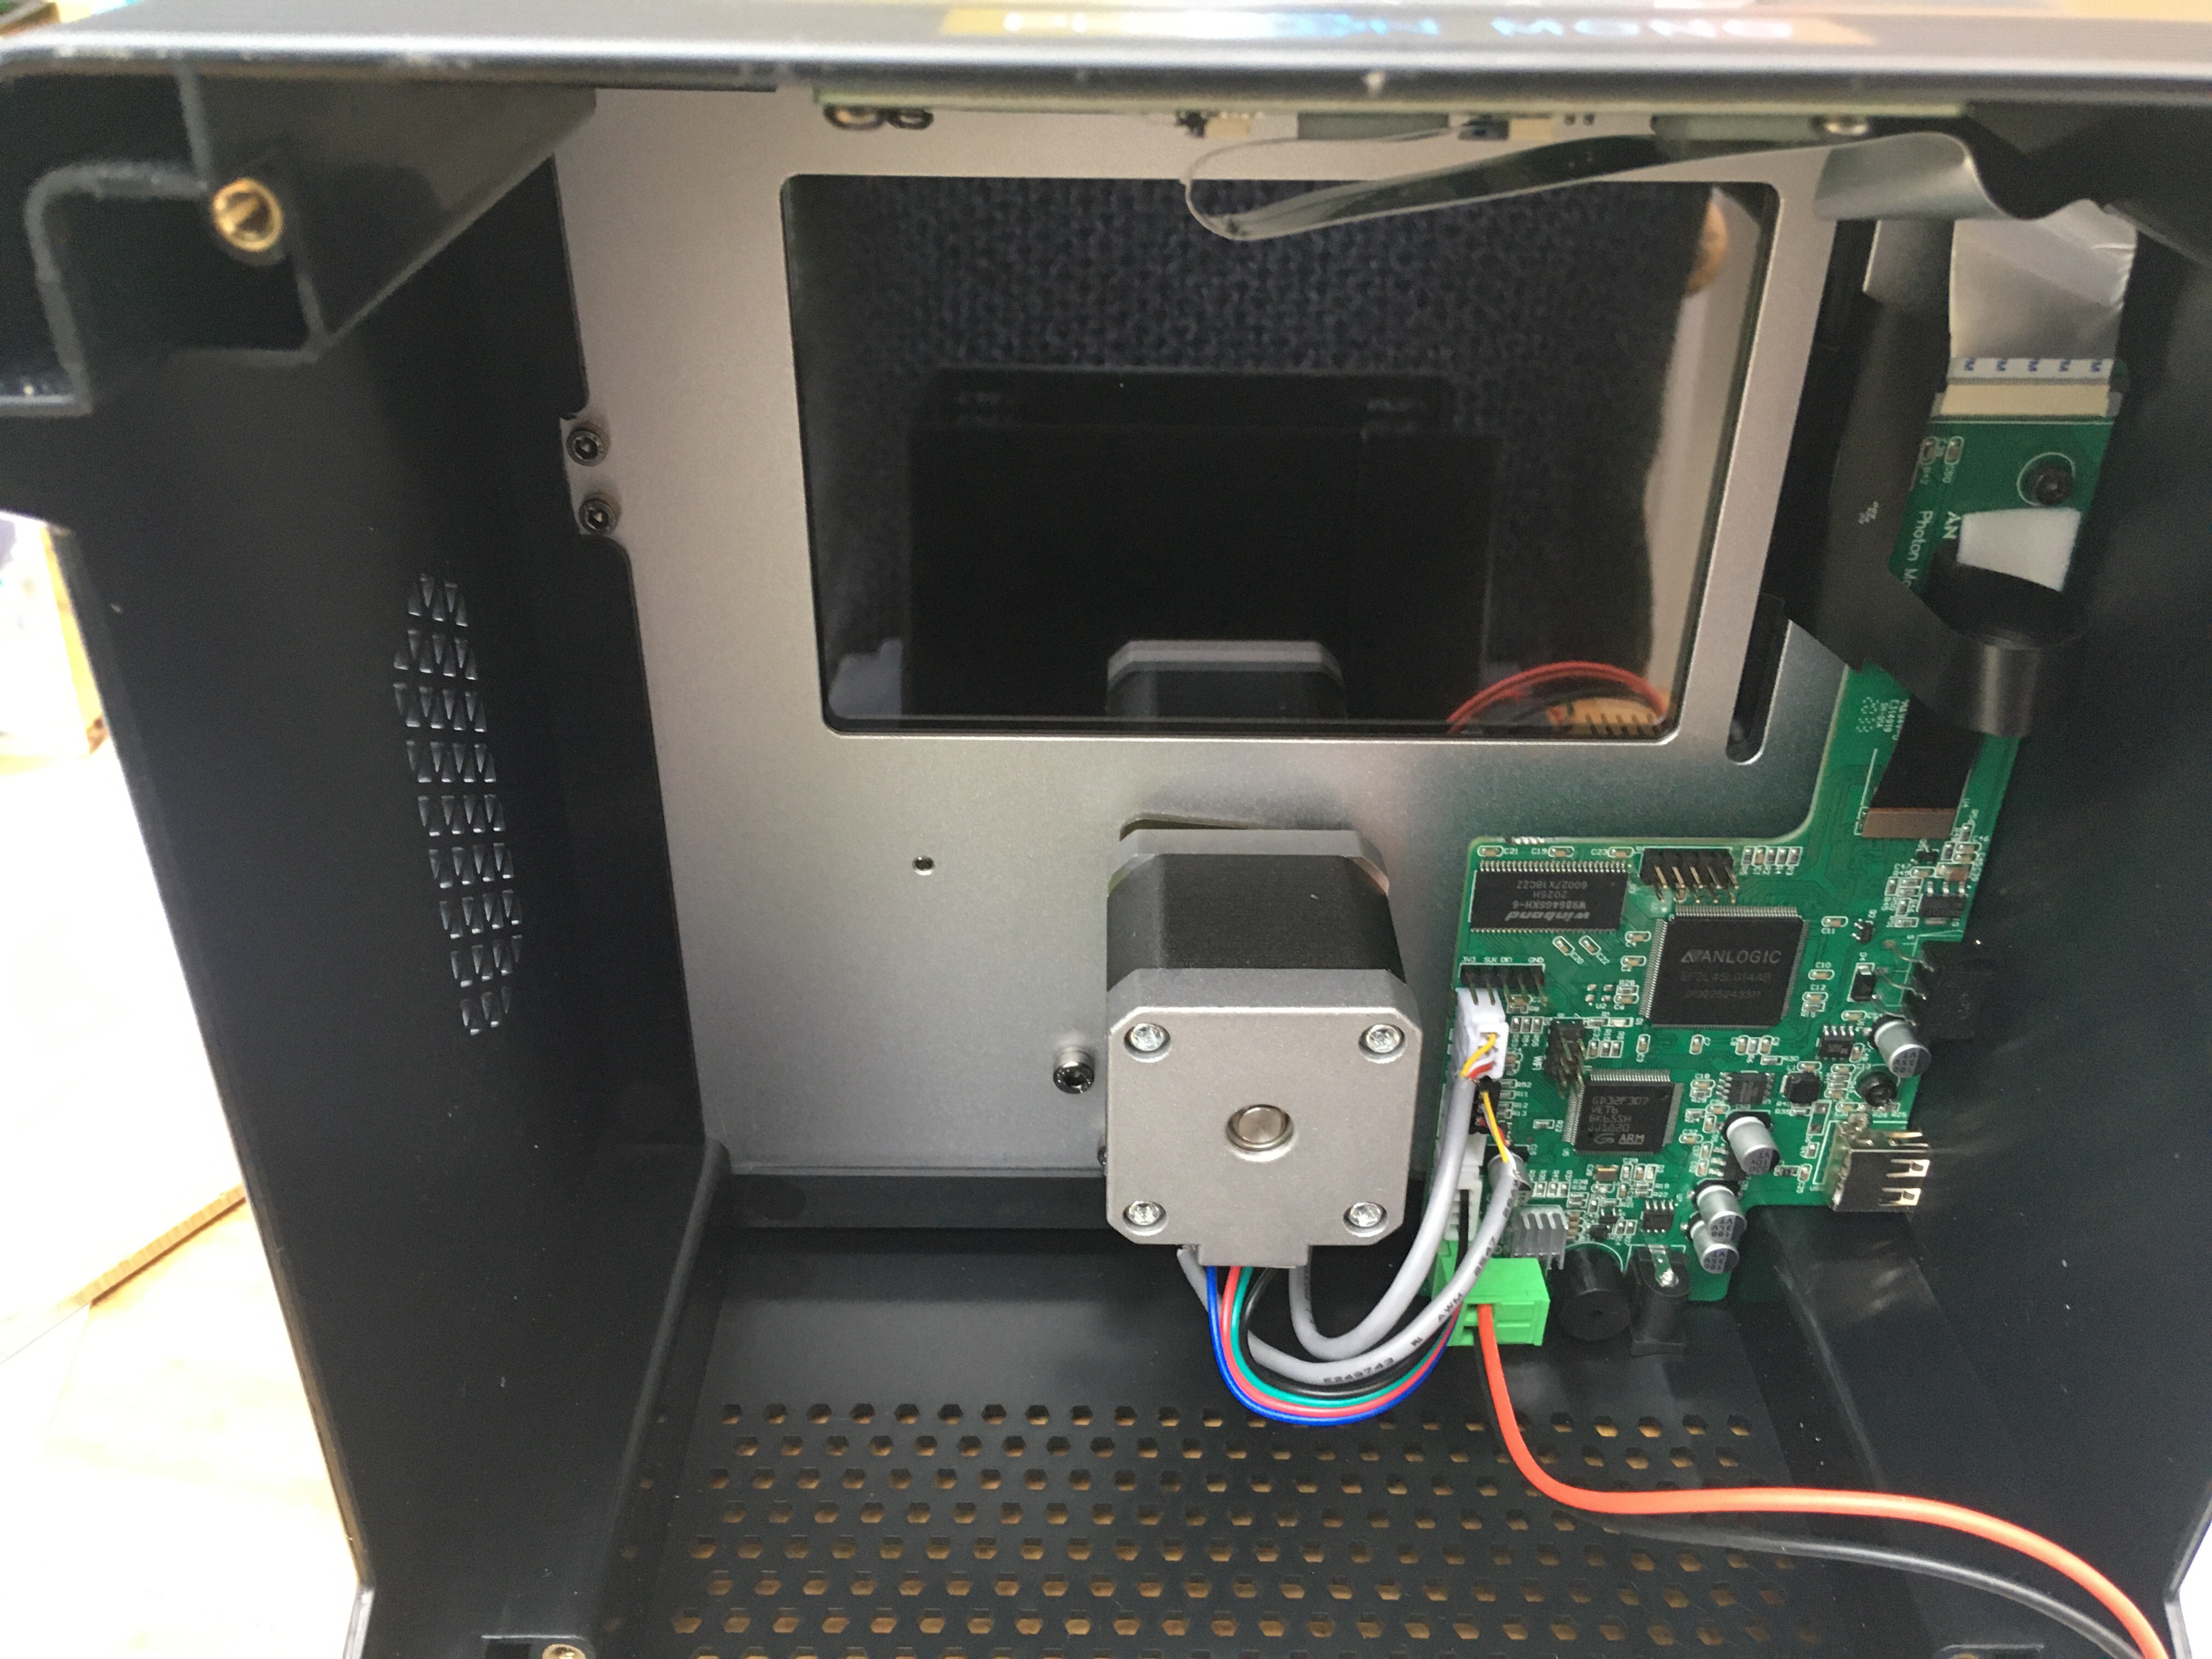
The PCB inside the Mono looks to be a custom PCB.
However, it’s widely known that Anycubic uses Chitu Systems drivers and panels
When I cracked open the Mono – I found really only 3 chips of significance…
An ANLOGIC FPGA – EF2L45LG144B –
and
a GD32F307 Arm Cortex M4 controller

Having a nose around ChiTu’s website found this little device – The ChiTu L M1
https://home.cbd-3d.com/hardware/controller-board/chitu-l-m18-9-4k-monochrome/
Have a look at page 12 / 73 and what do you spot ? – Item 8 – an ANOLOGIC EL2F Series FPGA Chip!!

AND….an STM32F407ZET6
Cortex®-M4 32-bit RISC core operating at a frequency of up to 168 MHz.

Sound familiar?
a GD32F307 Arm Cortex M4 controller – Cortex®-M4 Core @ 120 MHz
What this means? – No idea 😛
BUT, what this could mean…
1- The Anycubic Photon Mono board is possibly capable of using a 4K LCD
also, i’ve spotted that Chitu systems sells an ESP8266 module specifically for their boards – it could be that Anycubic plans on selling their own, or just goofed up with the polarity of the header on the board!
And, finally, after all the above, that i’m going to publish anyway, i’ve also spotted
Which looks practically identical, also has the FPGA and the ARM board and is only 2k!, D’oh!
More on the mechanicals this time – didn’t think to get some last time……..and, A revelation as to why it’s so quiet!
Continue reading “Anycubic Photon Mono Teardown Part 2”A first look at the guts
I got myself a Resin Printer!
So, Naturally, before printing with it, I attack it with a screwdriver – or hex driver in this case……..
Here’s the first tear-down and initial dismantling of the brand new Anycubic Monochrome Resin Printer

And, some more photos..
Continue reading “Anycubic Photon Mono Teardown – Part 1”

