
More on the mechanicals this time – didn’t think to get some last time……..and, A revelation as to why it’s so quiet!


There’s NO fan in this thing!!
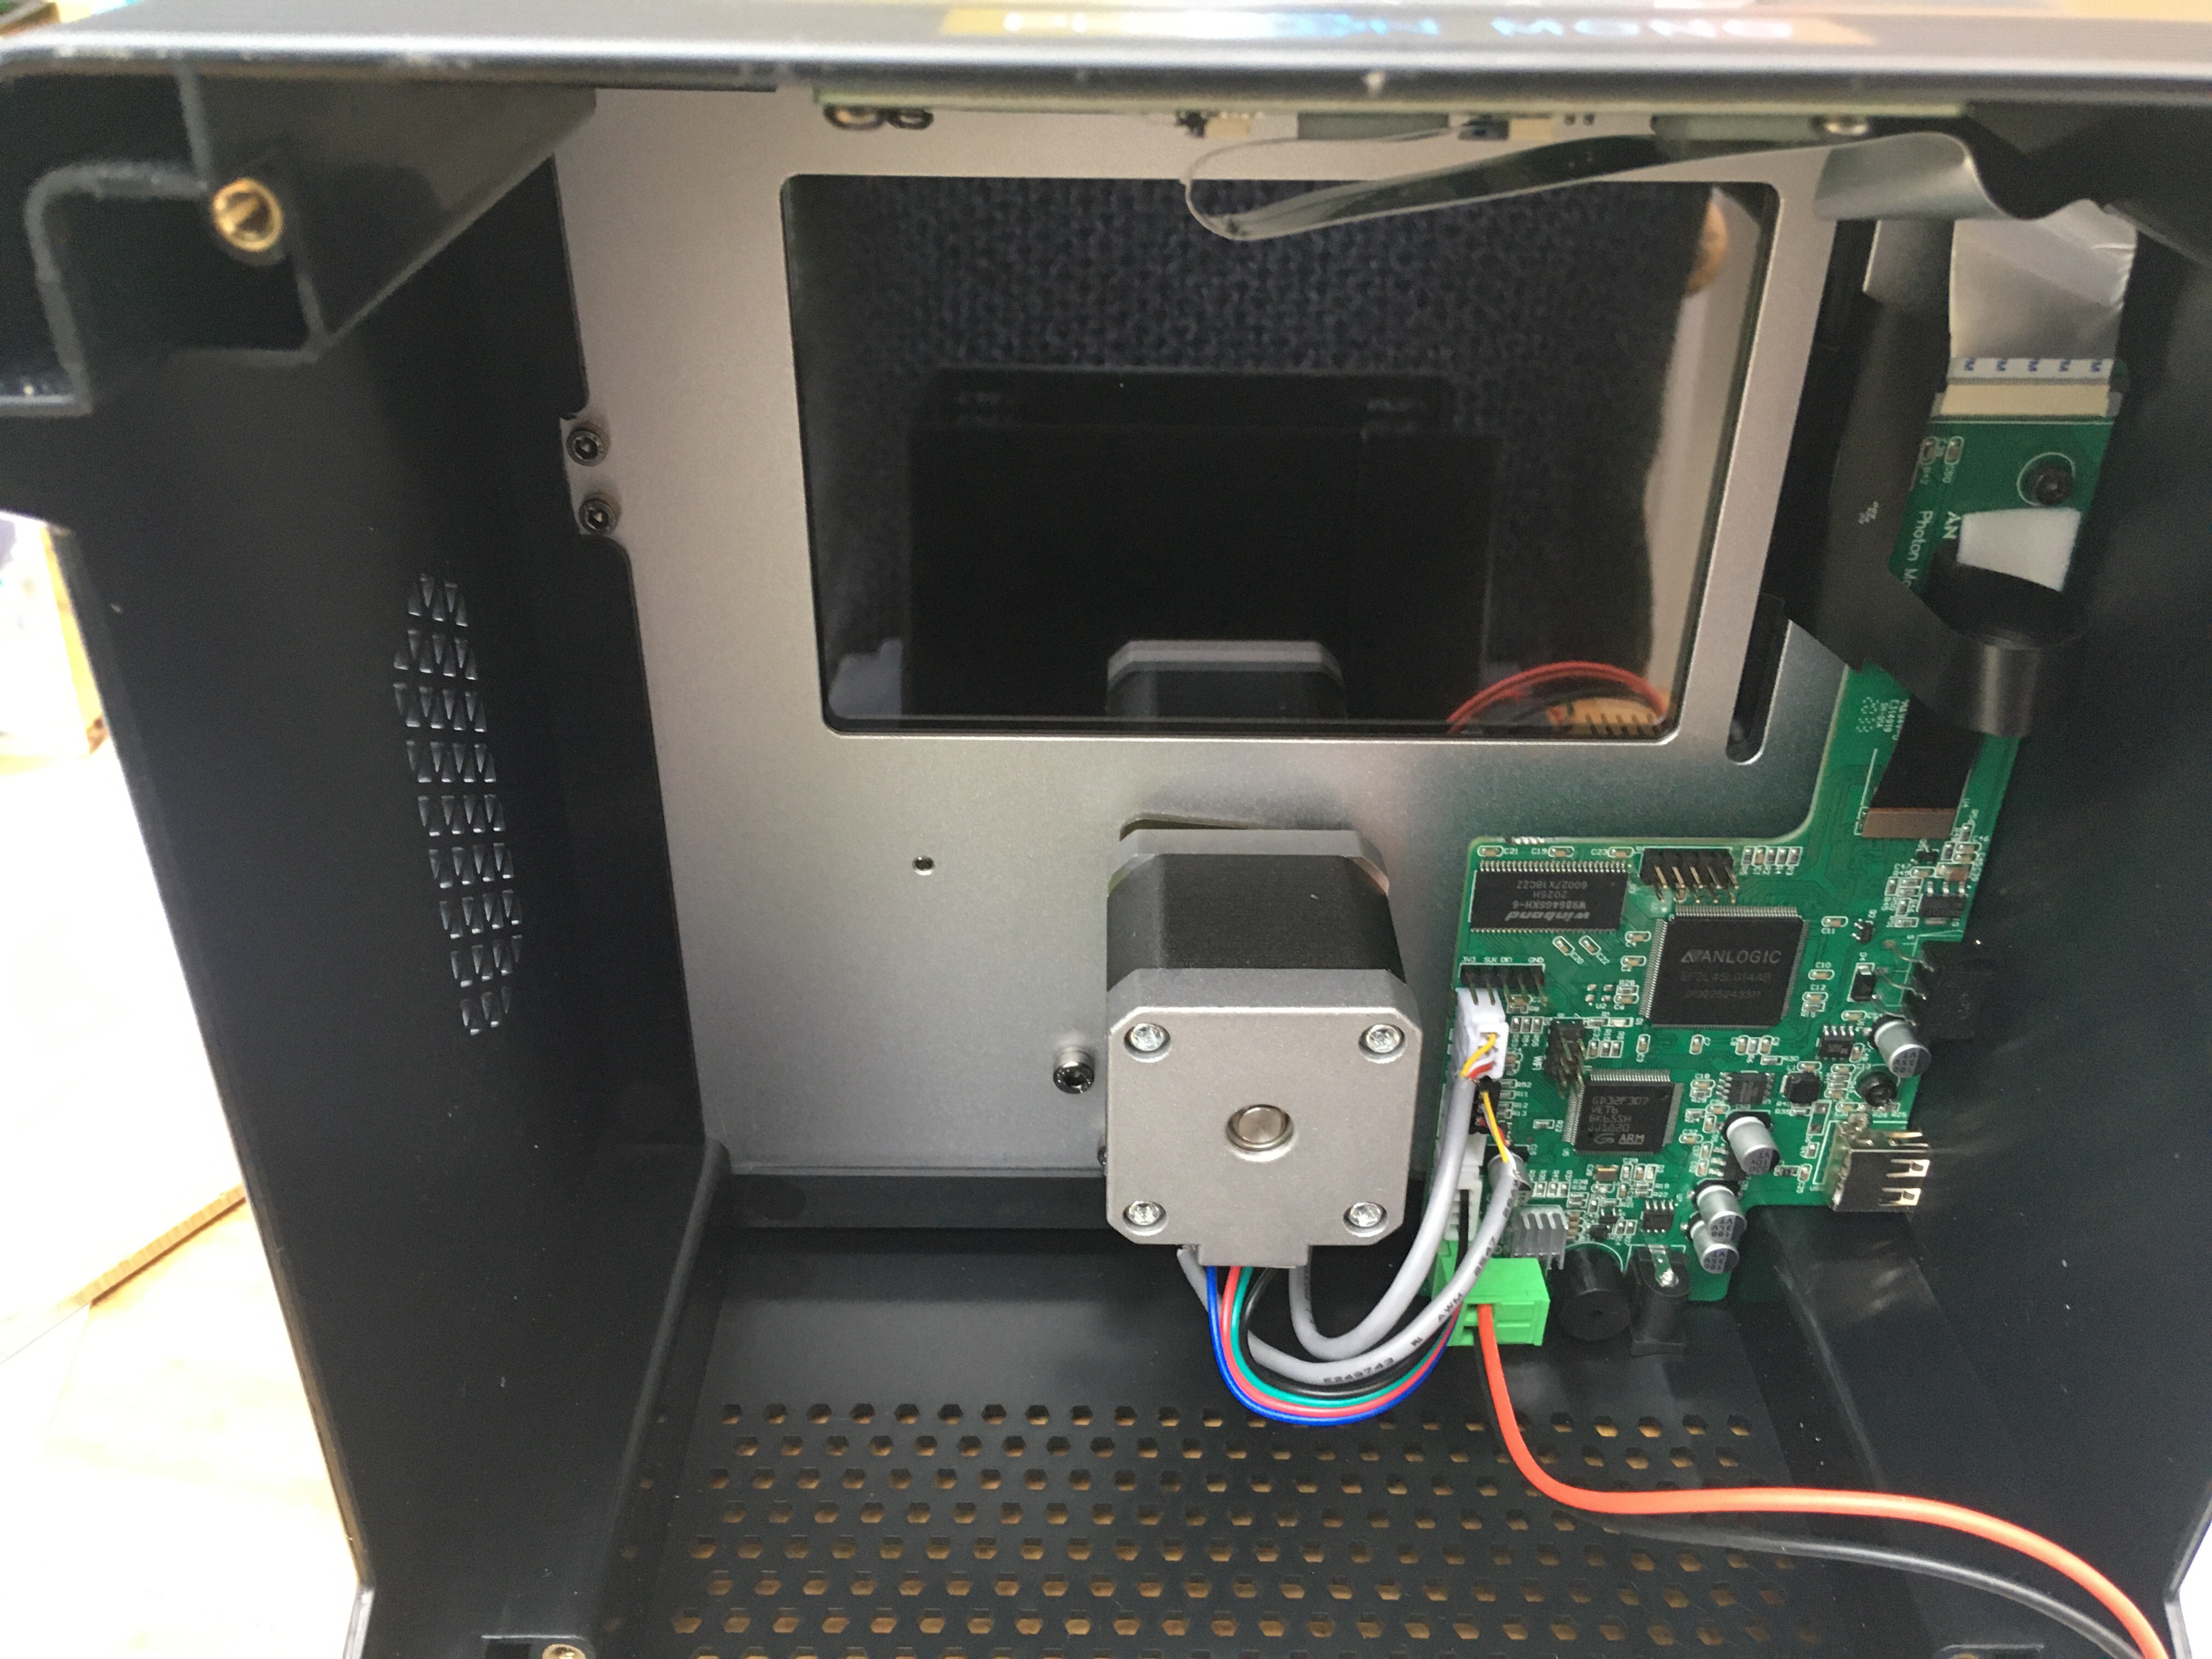
Many are reporting amazement at how silent this thing is in action – well, this is why. it’s JUST the stepper motor making noise (and the little buzzer)
The main reason for not needing any fan is due to the better light transmissibility of the monochrome LCD panel.
if (say) it passes 3x more light through than a normal LCD panel, then the UV LED needs 1/3rd of the time to be on to give the same exposure.
The LED panel is also cleverly mounted onto the steel baseplate – which acts as a massive heatsink.
I doubt it gets hot enough to justify the extra expense of a fan!
The Stepper driver (U9 in the picture above, just up and to the left of the large round buzzer), (heatsink removed in the picture above) seems to be the good old, tried and tested 4988 – which are noisy, but robust – incidentally, the TMC2208 is pin compatible for these, possible ‘upgrade’ maybe?


Anti vibration mount on the stepper motor!, impressive for this price

two optical detectors – one for the end stop for lowering the build platform into the resin vat. the other surrounded by Black is for the rear covering in position detection safety circuit

The Front Touch control LCD – Labelled SID240320-20PCB-A
markings suggest it’s a 240×320 LCD – 20? and Rev-A
A quick google – Brings up a similar number – a SID-240320-8PCB-D
which is also present on some Alphawise, longer and other Resin printers.
Not much I can find about this, other than it’s probably an ILI9341 Based display and would work with Marlin

Closeup of the lenses – looks like it’s a single piece cast plastic item. potential for upgrade here maybe to a glass one?

That’s a HUGE linear rail for the build platform, rock solid. Unsure what type – but it looks MGN15 sized as it’s quite a bit larger than the MGN12 size I put on my Wanhao D9
That’s it. Gotta get some heat-sink ‘glue’ now then i’ll be able to print with this thing :-), any questions, ask

Great! thanks for the quick tour to the internals of this entry level machine.
Not bad value for the money but no fan, really? We can see in your pics the fan connector in the mobo and the fan cutout in the metal bottom plate.
I´m afraid of asking if there is any filtration system for the resin fumes because that makes no sense, rigth? If so, such design decision and the “all in one” fep kit replacement (including the FEP film pre-tensioned in the plastic frame already) seems to me quite questionable ones actually.
I´m for one looking forward to read about your printing experience with this AC Mono anytime soon!
LikeLike
They have a more expensive Model to do the things you want!
It may well be that the base of this model also serves as a base for another…
I really think that a fan could be un-necessary, but time’ll tell once I start using it 🙂
There’s certainly no fume filtration…but saying that, there’s really no ability of the fumes to easily get out from the ‘cover’ as it’s slightly recessed on…
Add the anti-vibration mount on the stepper and with no fan it’s effectively sealed quite well. The only exposure to fumes will be when removing the cover!
I don’t know too much about FEP and longetivity here, but, o believe they’ll be making replacement vats available and the FEP is user replaceable so I can’t see that being too much of an issue either
Overall, I’m impressed, it’s extremely sturdy, a lot of R&D must have gone into the FPGA for driving the LCD’s .
This ‘feels’ like an expensive machine and it’s built like one
The workmanship shows that there’s quite a long way to go before these things hit ‘bottom’ pricing like FDM printers have 🙂
LikeLike
Thanks for the reply.
Please, do not get me wrong because I´m not complaining at all.
I think this Mono looks like a great value for the money printer as it has ticks in all the must have checkboxes: led array, a capable 2K modo lcd and lineal rail.
I´m just a tad surprised to see the route AC has taken for building this machine as least with no active cooling or air filter as other desktop printers. No idea if that has been cutting some corners or the rigth decision but if you ask me I´m for one that the more silent any 3D printer is the better always. 🙂
I can not comment on the electronics, sorry, but if your impression is that those are good too then better too!
LikeLike
No fan, it’s a great thing. Clearly they designed one in or re-used generic components and realised upon testing that no fan is needed.
having a cheaply made thingy spinning at several thousand RPM for long durations is a recipe for expensive failures and customer RMA’s in the future.
if you can avoid a fan, it shaves a few $$ off the product BOM, in the quantities these things sell at, that’s big bucks saved in up front costs and long term support costs.
There’s no filtration because there doesn’t need to be. no fan, no circulation of air and a fairly good ‘seal’ means that not much escapes really.
saying that though, if you really wanted filtration, there’s nothing stopping you knocking a few holes in the case of the printer itself and pulling air down through some sort of activated charcoal filter! which you install into the bottom of the enclosure… after all, there’s a fan header on the circuit board, or just drive it with your own power from somewhere.
The FEP ‘issue’ is actually a forward thinking (but poorly handled) move by Anycubic. they clearly recognise a LOT of their customers are Noobies…this selling of pre-tensioned film is quite clever!.
doubly so now that 3rd party / more traditional vats are available for the more discerning and edumacated FEP Film replacer types.
if you want to see how good Anycubic are at cost reducing, check out the Wash and cure station 1 vs the wash and cure 2.
the first is built like a tank. the second is a lot more plasticy!
still haven’t used the printer yet 😛
LikeLike
I know you’re not complaining 🙂 no stress there at all!, i’m just impressed that there’s a reasonably large FPGA in there AND a more conventional 32 bit processor rather than a simple HDMI / LCD board………it would have taken quite a bit of engineering effort to do this, seriously impressive stuff….it’s also all metal too!,
LikeLike
How about the noise from the stepper in this printer. Is it relaxing and quiet or really loud?
LikeLike
Still haven’t printed with it yet but playing with it and driving the thing up and down, doesn’t seem noisy at all, quieter than my two FDM printers I’d say 🙂
LikeLike
Thank you for the detailed listing of all components!
I would like to change the stepper driver, but do not know exactly how to do it?
Just unsolder the A4988 and solder a TMC2208?
On my FDM printer I also changed the driver, but it was a small board where you could adjust the current.
Thank you very much for helpful tips 🙂
LikeLike
Hi,
in theory it’s a ‘pin for pin’ replacement, when set to ‘legacy mode’
in practice, it’s a little more tricky, the current resistors are soldered directly to the motherboard, you’d need to understand the circuit diagram a little before attempting the mod.
The Datasheets of both stepper driver devices will guide you well and help you identify which resistors to change
there’s also a number of people out there on the interwebs that have done a similar swapout – A4988 to TMC2208 chips on other printers,
https://blog.trinamic.com/2018/04/15/how-to-replace-an-allegro-a4988-with-the-tmc2208/
Click to access AN045-How_to_replace_Allegro_A4988_with_TMC2208_01.pdf
https://www.thingiverse.com/thing:3156113/comments
This one’s great
and, probably the most simple and relevant
https://hackaday.com/2020/02/14/a-little-rewiring-teaches-a-creality-ender-3-new-tricks/
which links to
https://simons.tech.blog/2020/01/19/creality-ender-3-v-1-1-3-tmc2208-uart-mod/
Good luck, let me know how you get on and i’ll probably do the same mod to mine 🙂
LikeLike
Hi mate, you know if the printer mounts an antibacklash nut on the z axis?
My mono is suffering z-bobble a lot
LikeLike
Looks like it does, the whole gold thing that links to the rotating screw has what looks like a spring structure inderneath.
Show some pics of the wobble, it’s not an issue I’ve heared about. Saying that though, check everything is tight, there should be zero apparent play, no matter how tiny it frels
LikeLike
if you have use it can you tell how good its passive cooling? especially for long printing duration
LikeLike
It gets to high 20’s / low 30’s in my conservatory. I print with a towel over t he printer to protect it from UV. Haven’t seen any issues related to temperature yet.!
LikeLike
i see the part number for the touchscreen…. is sid240320-20pcb-a
I can’t find a replacement for this mine stopped working and i need to replace the touchscreen… any ideas where i could find one?
LikeLiked by 1 person
Hiya. Maybe Chitu Systems have those screens. the SID240320 is a fairly generic screen though. I found a superb ‘blog’ the other day on tearing down the Mono-4k version – https://github.com/nviennot/reversing-mono4k . May be worth having a look there to see if it’s the same screen, and again , Chitu Systems may sell them! –
LikeLike
sorry i missed this , is it working now? – the screens are failry ‘stamdard’
LikeLike
this might be a longshot but do you know the voltage of the step up converter for the uv array?
I got a faulty one and got it pretty bright at 15 volts but the prints seem to fail after it goes from the 45 cure time to the 2 second cure time so I’m assuming that 15 volts is too low and they’re dimmer than they should be.
I checked voltage of uv lights and it seems like the grid might actually run at 17 – 18 volts but last thing I want is to fry them so I’m trying to be careful. Thank you for any help in advance
LikeLike